Jekyll2026-07-26T20:24:54+00:00https://danieloz147.github.io/feed.xmlDaniel Oz | Security ResearchOffensive security research. Writing about vulnerabilities, how they were discovered, attack surfaces, exploitation, and breaking modern systems.Daniel OzAudio Is Not Just Output. It Is a Channel.2026-07-21T00:00:00+00:002026-07-21T00:00:00+00:00https://danieloz147.github.io/2026/07/21/audio-is-not-just-output-its-a-channel
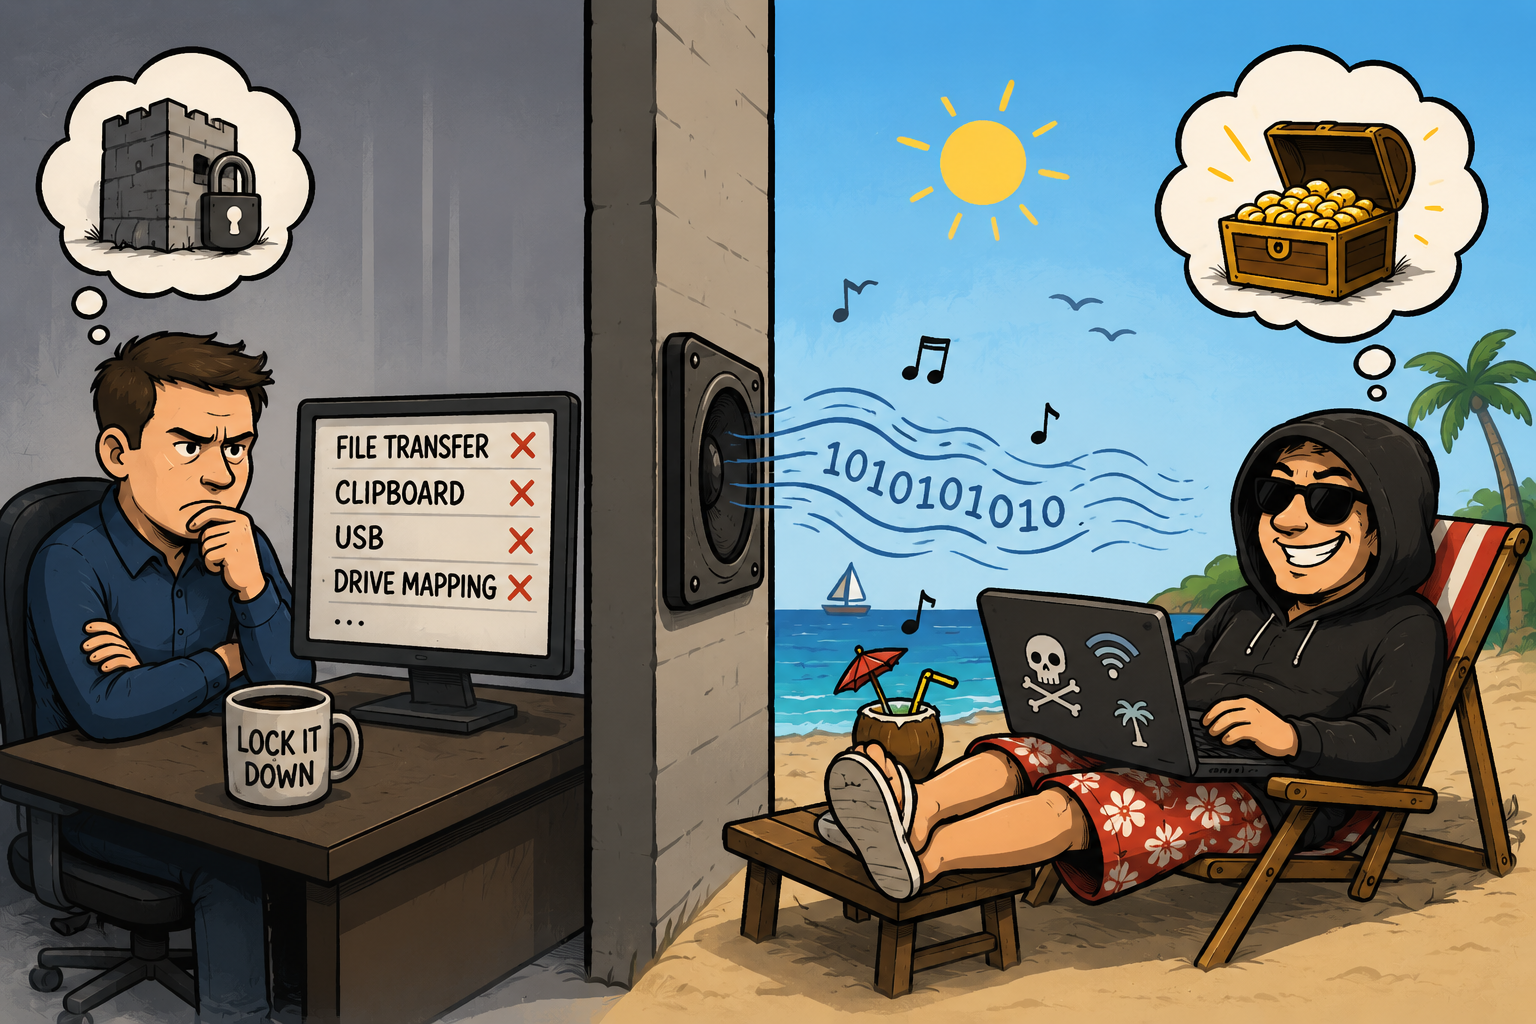
Most security reviews begin by listing features: file transfer, clipboard, USB redirection, browser access, audio, printing, and so on. The assumption is simple: if enough features are blocked, the attack surface becomes small enough to manage.
That is often a useful defensive view. It is not how an attacker thinks.
An attacker usually does not care whether a system exposes a feature called file transfer. The real question is more fundamental: can information still cross the boundary?
That shift sounds semantic, but it changes everything. Once you stop thinking in terms of named features and start thinking in terms of channels, you stop asking what the product claims to allow. You start asking what the system still makes physically possible.
Citrix environments are a good example. You can disable the clipboard, block drive mapping, prevent USB passthrough, and still leave several paths that must remain available for normal operation. Users still need to see the remote desktop. They still need to hear alerts. They still need to provide input. Every one of those paths is a form of information transfer.
That is the key idea behind this research. Audio was not interesting because it was a forgotten feature. It was interesting because it was still a live channel.
Blocking features does not always block channels
The Mindset Shift
The most important change in this project happened before a single line of code was written.
At first, the problem looked like an offensive-security question: can data be moved across a VDI boundary through sound?
Very quickly, that stopped being the real question.
The real question became this: if Citrix audio is treated as a communication channel, what does that channel actually preserve? Which parts of a signal survive the trip? Which parts are destroyed by the codec, the operating system, the transport path, and the endpoint audio stack?
That is a very different problem. It is no longer about finding a trick. It is about characterizing a medium.
Once you look at it that way, the work changes completely. Instead of choosing a clever modulation method first, you start by measuring the channel. You ask which frequencies survive, whether amplitude stays stable, whether phase remains usable, how much noise is introduced, and how short a symbol can be before the codec smears it beyond recognition.
In other words, the project moved from offensive security into communication engineering.
Fact 01
The best modulation is not the one that carries the most information, but the one that survives the channel best.
What Broke First
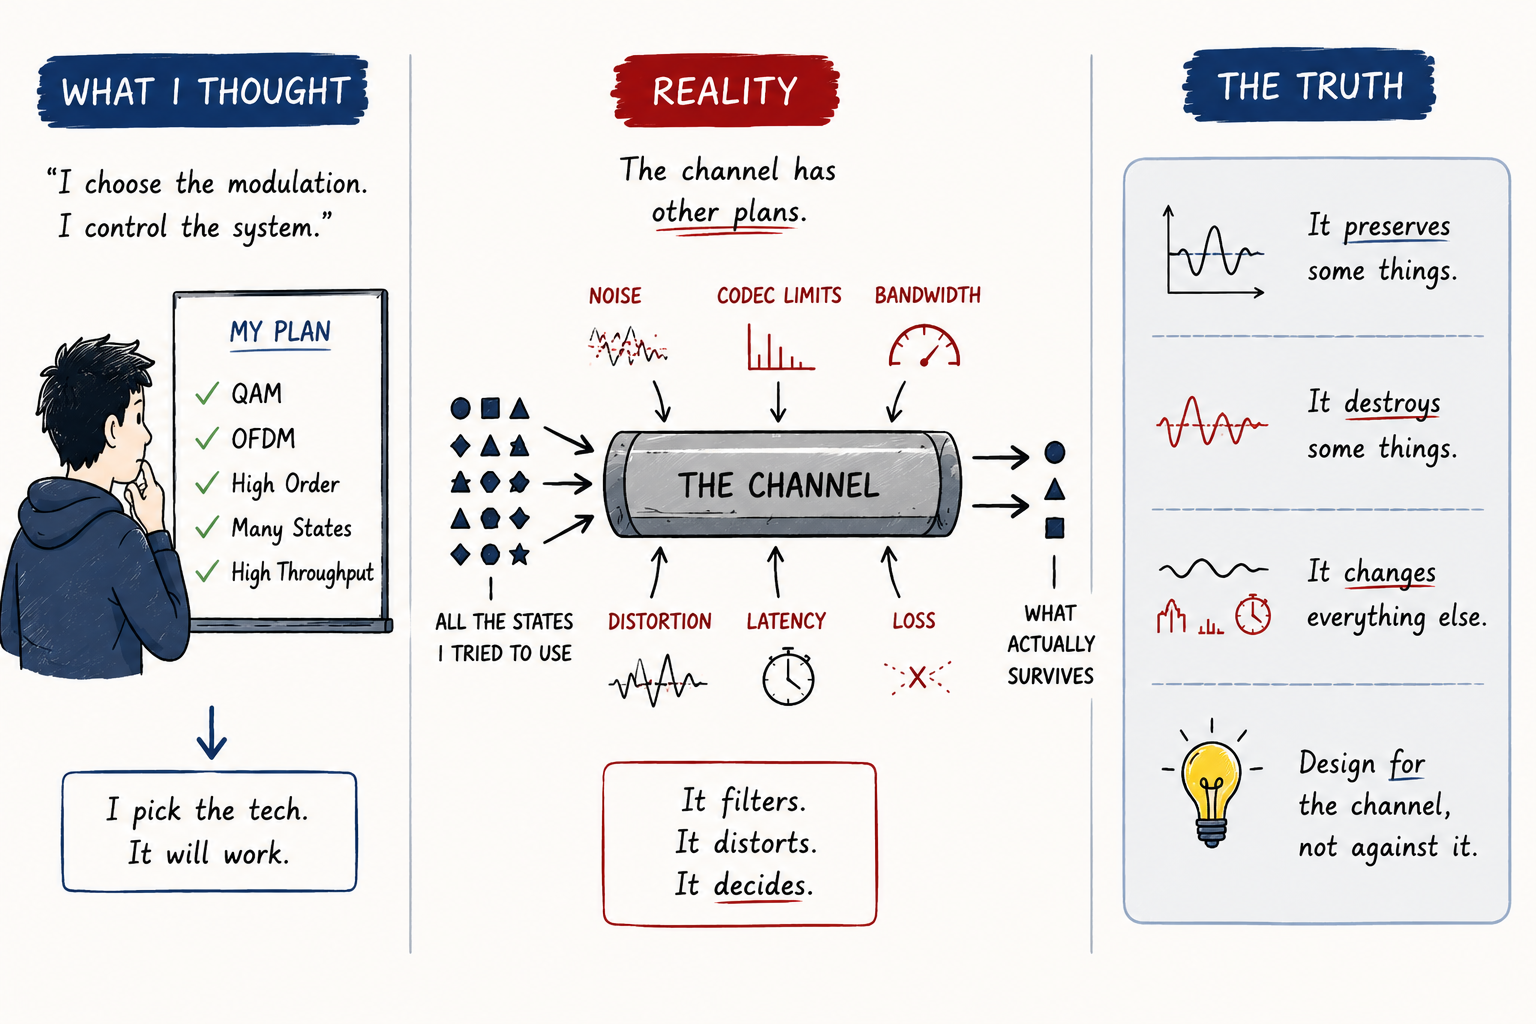
One of the first assumptions to collapse was the idea that the most advanced-looking modulation scheme would automatically be the best choice.
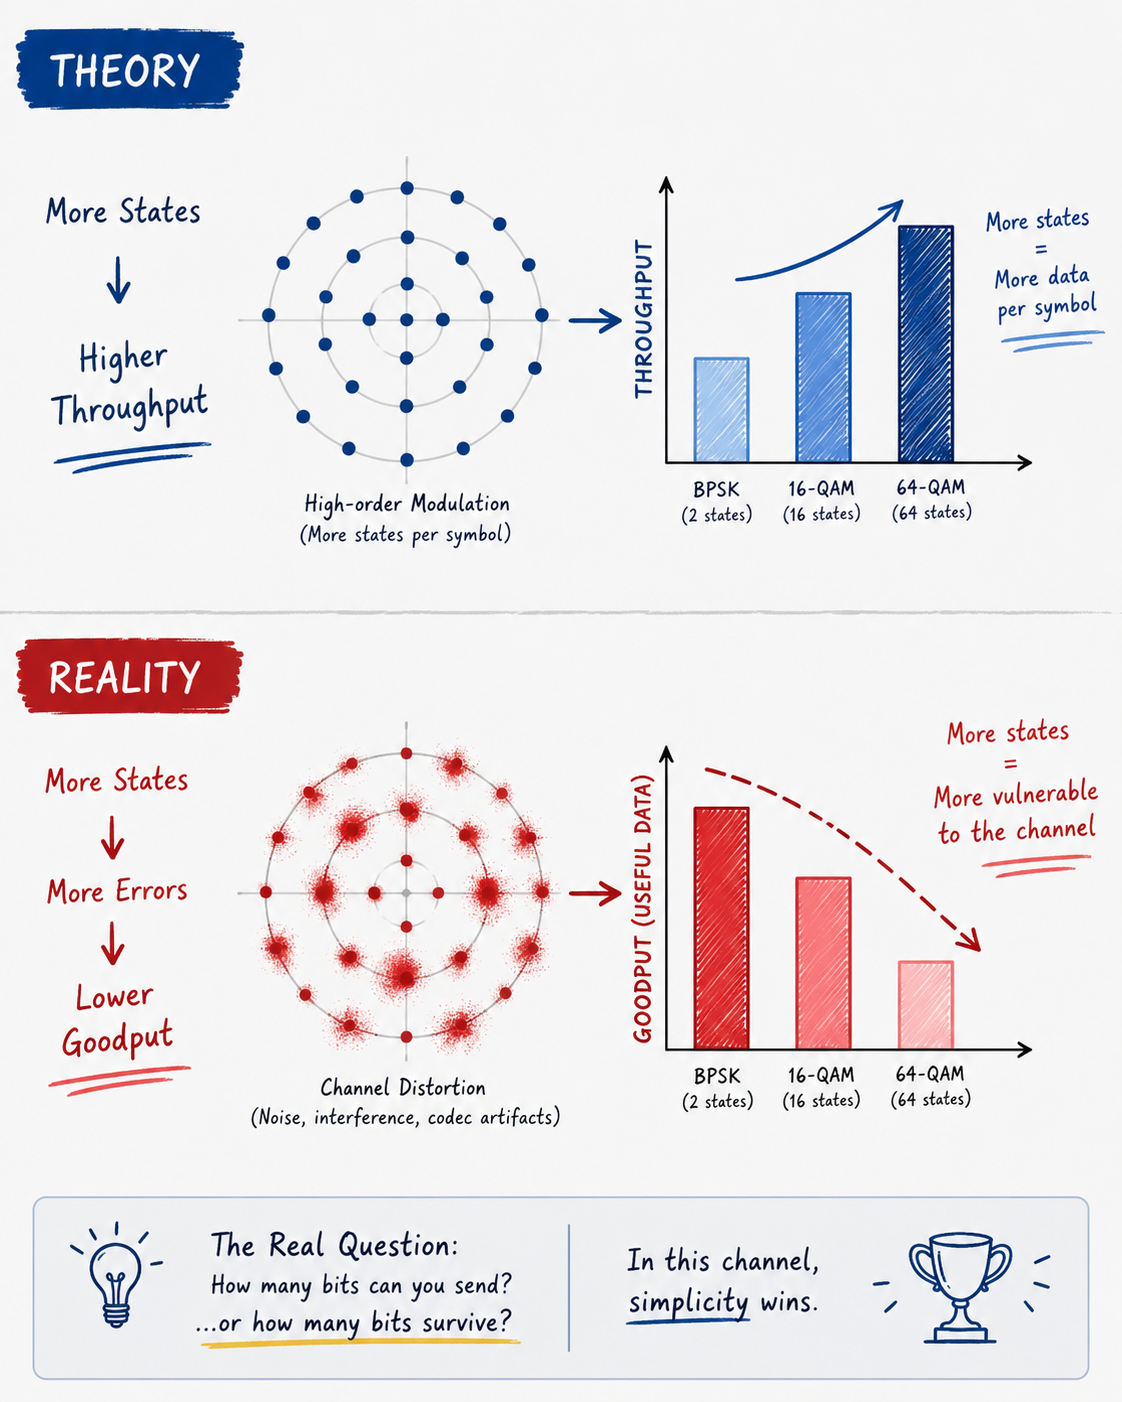
On paper, complex modulation looks powerful. It promises better spectral efficiency, more bits per symbol, and higher theoretical throughput. But those advantages only matter if the receiver can still distinguish the states after the signal has passed through the real channel.
That was not what happened here.
The Citrix audio path did not behave like a clean textbook channel. The codec introduced its own preferences. Some frequency regions held up better than others. Some signal properties survived reasonably well. Others degraded enough to become unreliable. At that point, theory stopped being the deciding factor.
Measurement took over.
Fact 02
I did not choose the architecture. The channel chose it for me.
At this stage, that became the most useful mental model. The channel dictated what could survive. The codec dictated what remained distinguishable. The noise dictated how much ambition was realistic.
The channel dictated the architecture more than theoretical preference did
Why Measurements Mattered
The deepest lesson from this work was not about Citrix specifically. It was about methodology.
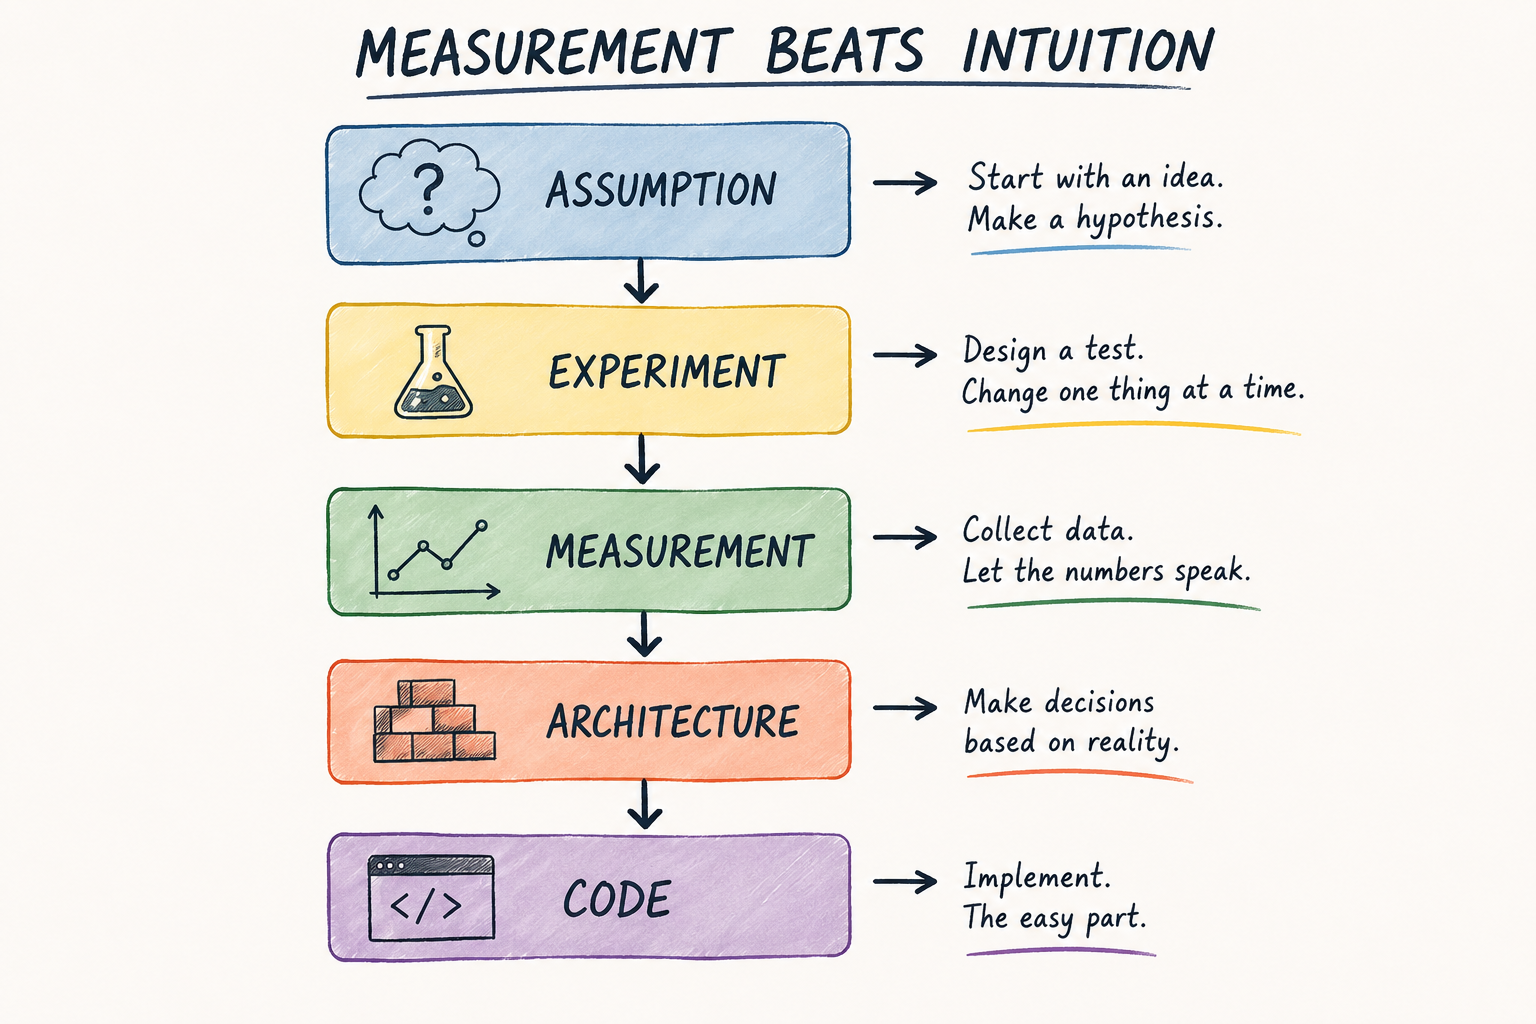
At almost every stage, intuition was less useful than direct measurement.
Ideas that sounded superior in theory often performed worse in practice. More carriers did not always help. More states did not always mean more usable bits. A scheme that looked less elegant on paper sometimes transferred more real information, simply because it survived the channel better.
That is the point where this stopped being an exercise in cleverness and became an engineering problem. Instead of asking what should work, the right question became: what does the channel prove that it can carry?
Fact 03
Measurements are always better than intuition.
What Came Out of It
The result was not just a rough proof of concept. Over time, it became a full communication system: compression, framing, synchronization, modulation, error correction, interleaving, validation, and recovery.
That system became VDI Bridge.
It was not built by starting with a perfect design and then coding it faithfully. It was built by failing, measuring, adjusting, and narrowing the solution space until only the combinations compatible with the real channel remained.
If you want to see the implementation layer, the demonstration, and the transmission pipeline, the deep dive goes through the engineering decisions in detail:
]]>Daniel OzDeep Dive: When the Speaker Becomes a Communication Channel2026-07-21T00:00:00+00:002026-07-21T00:00:00+00:00https://danieloz147.github.io/2026/07/21/think-like-an-attacker-when-the-speaker-becomes-a-communication-channel
Offensive Security starts with questions, not tools.
In Citrix and VDI, the real problem is not the feature itself, but whether information can still cross the boundary.
The audio path is not a vulnerability in the usual sense; it is a legitimate communication channel with measurable constraints.
The codec, not the modulation, became the real bottleneck.
Measurements mattered more than intuition, and simple designs survived better than sophisticated ones.
Writing the code was the easy part; understanding the channel was the hard part.
Introduction
One of the clearest differences between offensive and defensive thinking is not the tooling, the technical depth, or even the experience of the people involved. It starts earlier, with how each side defines the problem it is trying to solve.
In many organizations, security is translated into a list of capabilities to allow or block. VDI is a good example. An administrator can choose whether file transfer is allowed, whether the clipboard is blocked, whether local drives are mapped, or whether USB devices are permitted. At first glance, this seems like a reasonable way to evaluate security posture. The more capabilities you block, the smaller the attack surface appears.
Attackers, however, rarely think in terms of capabilities. From their perspective, a capability is just one implementation of a more basic idea: information transfer.
This shift, from capability-based thinking to channel-based thinking, marks one of the main differences between penetration testing and Red Team or Adversary Emulation thinking. Instead of asking whether files can be transferred, the first question becomes whether any mechanism still allows information to cross the boundary. It may sound like a semantic change, but it materially reshapes both system analysis and opportunity discovery.
Citrix environments illustrate this well. You can block all common file-sharing mechanisms and still leave channels that are essential for normal operation. Users still need to see the remote desktop, hear alerts, and provide keyboard input. Each mechanism serves a different functional purpose, but from an engineering standpoint they share the same property: they transfer information from one point to another.
Once this perspective is adopted, audio stops being just “sound output” and becomes a communication channel. More broadly, any component that can transfer information between two sides stops being just a feature and starts being a channel. It is a small conceptual shift on paper, but it has a large effect on offensive reasoning.
It is important to emphasize that this article is not about a Citrix vulnerability and does not present a “break” in the conventional sense. The audio channel behaves as designed and does not rely on a faulty implementation. The research is not about bypassing security through a bug. Instead, it examines how a legitimate path can be analyzed as a communication channel with defined engineering characteristics. That distinction matters because it highlights the difference between exploiting vulnerabilities and leveraging inherent system properties.
This is the starting point of the research described in this article.
The goal of this research was not simply to test whether exfiltration can be done through sound. The deeper question was whether Citrix audio can be treated as a communication channel in a full engineering sense, and which physical and technical constraints determine data rate, reliability, and resilience to codec-induced distortion.
The transition from an Offensive Security question to a Communication Engineering question happened before a single line of code was written. Most later decisions, from modulation choice, to protocol structure, to error-correction design, were driven by channel characteristics rather than by preference for any specific technology.
This is also the central message of the article. Although it ultimately presents a communication system operating over the Citrix audio path, it is not about audio alone. It is about the mindset shift that leads an attacker to stop viewing system components as isolated functionality and start viewing them as measurable communication channels with physical constraints.
Answering this question required stepping, at least temporarily, outside the cyber domain and into communication engineering. Only after understanding the physical principles governing the audio channel was it possible to make informed decisions about how to use it.
Figure 1 - Blocking features does not always block channels
Breaking Down the Problem
After deciding to stop thinking in terms of capabilities and start thinking in terms of communication channels, it became clear that the next step was not writing code. In fact, writing code was one of the final stages in the process.
In any communication system, there is a fundamental question that must be answered before almost any other engineering decision: what is the nature of the channel available to me?
This may sound like a trivial question, but in practice it dictates almost everything that follows. Modulation strategy, transmission rate, error-correction design, packet structure, and even synchronization logic are all derived from channel characteristics, not from preference for a specific technology.
This is also where I see many studies start in the opposite direction. A modulation method is often chosen first, a proof of concept is built, and only then do people check whether that method is even suitable for the channel. To me, that is backward. Modulation is a solution to an engineering problem; it is not the starting point.
So before writing a single line of code, I tried to understand what really moves between both sides of the VDI boundary.
At that stage, the Citrix environment itself was almost secondary. Communication was the primary focus.
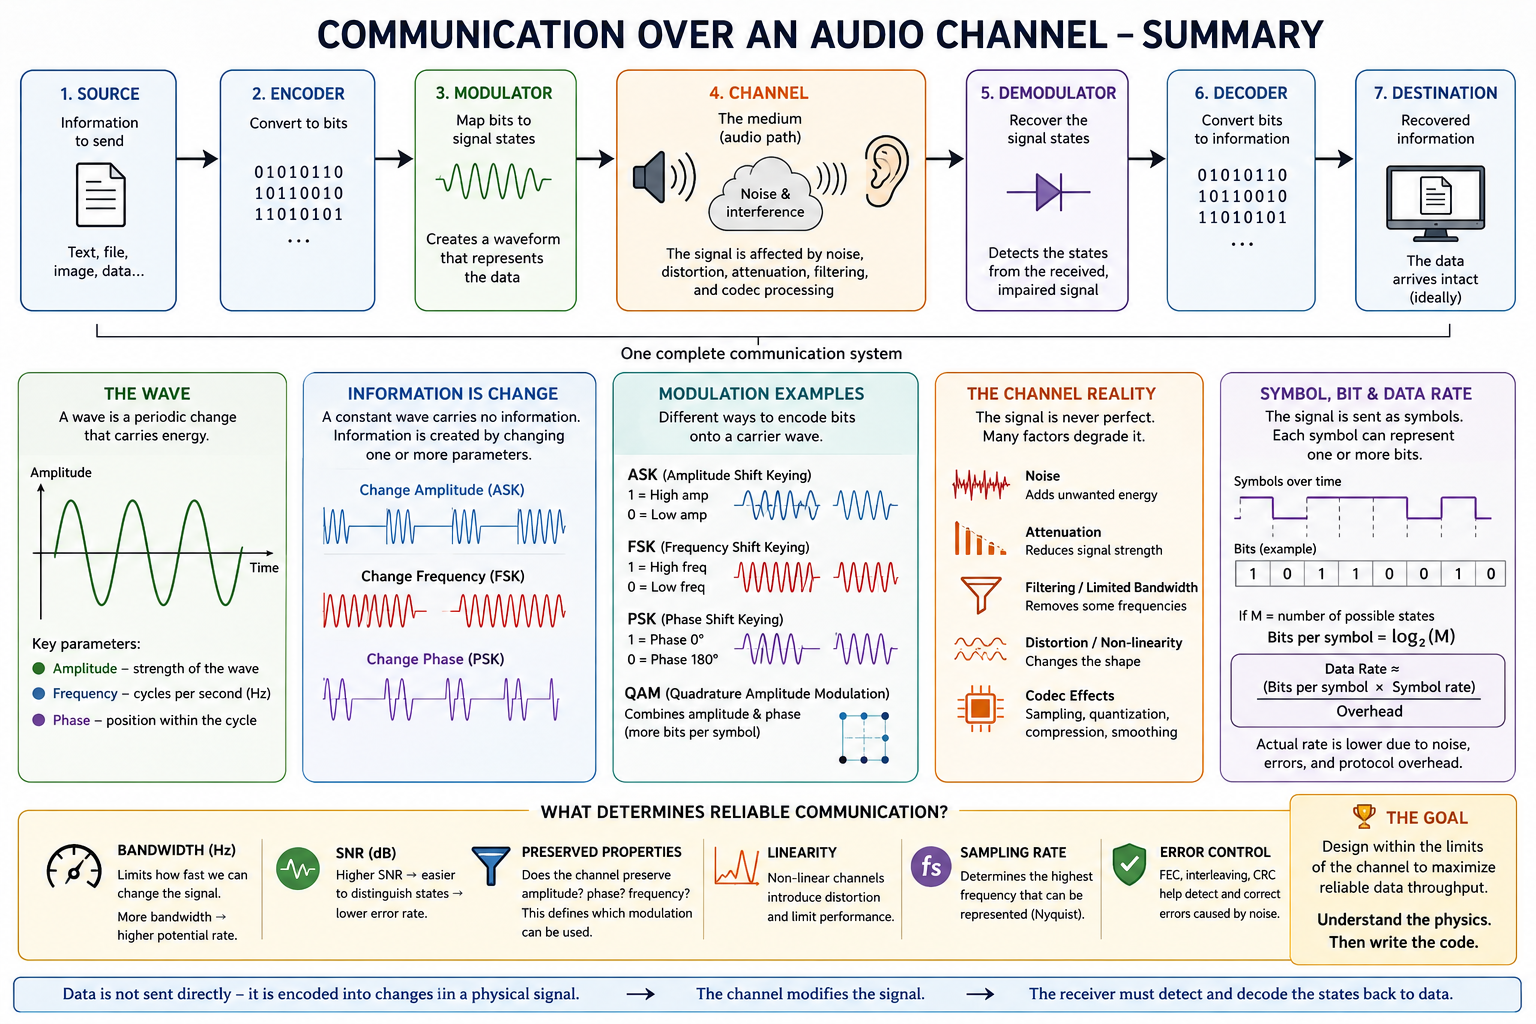
If we look at the audio path abstractly, it is simply a mechanism that moves a wave from one point to another. From a physical perspective, there is no essential difference between a radio wave, Wi-Fi, Bluetooth, or sound. In all cases, energy is transmitted over time, and the only question is how to make variations in that energy represent information. That is, in essence, the definition of a communication system.
The information itself is meaningless to the channel. The channel does not know whether we are trying to send a Word document, a ZIP file, an image, or a video. For the channel, everything is reduced to a bitstream. This means the real problem is not how to transfer a file, but how to map bits into physical variations that can be generated, transmitted, and reliably detected on the receiving side.
At that point, it became clear that the real objective was not building an exfiltration tool, but building a communication system. In classical communication-engineering terms, that means building a modem: a system that converts digital information into a signal suitable for a physical medium, sends it through a constrained channel, and reconstructs it at the receiver.
Once I viewed the problem this way, the work order changed completely. Instead of asking “which modulation is best?” I started with much more fundamental questions:
What is a wave, and how can it be used to carry information?
How can digital data be represented on top of a wave?
How do we convert a file into a sequence of physical signal changes?
What is modulation, and why are there so many modulation methods?
What is the channel bandwidth, and how does it constrain transmission rate?
What is signal-to-noise ratio (SNR), and why is it one of the most important parameters in any communication system?
Which frequencies survive channel passage, and which are attenuated or lost entirely?
Does the channel preserve all signal properties, or only some of them? Can we rely on phase, amplitude, frequency, or only on signal presence?
Does the channel behave linearly, or does it alter the signal as a function of intensity, content, or other attributes?
At what sampling rate does the channel operate, and how does this impact transferable information?
What is the maximum throughput the channel can support, and where is the true system bottleneck?
In retrospect, these were the most important questions in the entire research. From that point on, I was no longer looking for tricks to bypass system limits. I was trying to understand the limits themselves, because every limit you understand becomes a design constraint you can work with.
In other words, before deciding how to transmit, you must first understand what the channel is capable of carrying.
For that reason, the next chapter is not about Citrix or PowerShell. It is about wave physics. Before choosing modulation, setting transmission rates, or designing a protocol, you need to understand the physical properties of waves, which properties can be modified to represent information, and which properties survive channel passage. Only after that foundation can a communication system be designed in an informed way.
Warning note: the next chapter is very dense. If you do not want to dive into the physics behind the process, you can skip the physics chapter.
Understanding the Physics Before Writing Code
Before we can understand how to transmit information through sound, we need to start with a more fundamental principle: information does not “move” by itself. It is always represented through a change in some physical phenomenon.
When we send a WhatsApp message, browse the web, or listen to music over Bluetooth, there are no literal bits floating through the air. What actually propagates is a change in a physical property within a medium. In Wi-Fi, that medium is electromagnetic waves. In fiber optics, it is light. In an audio path, it is pressure variation in air.
In other words, a communication system does not transfer information directly; it transfers energy, while information is encoded through changes in that energy. This is the foundation of every modern communication system.
What Is a Wave?
A wave is a disturbance that propagates through space and transfers energy from one location to another, without transporting the material itself.
When a speaker plays music, it does not “send air” to the listener. The speaker diaphragm moves back and forth, creating periodic pressure changes in the air. Each air molecule moves slightly around its local position, transfers energy to neighboring molecules, and returns to nearly the same place. The result is a sound wave propagating through space.
The same principle applies to radio waves, light waves, and other communication forms. The difference is not in the idea itself, but in the type of energy being transferred and the medium in which it propagates.
The Three Core Properties of Any Wave
Every periodic wave has three basic properties we can control:
Frequency: Frequency is the number of cycles a wave completes per second, measured in hertz (Hz). A frequency of 1000 Hz means the wave completes one thousand cycles every second. In hearing terms, this is perceived as pitch. Higher frequency generally sounds higher.
Amplitude: Amplitude represents the strength of the wave’s oscillation. In sound waves, this maps to loudness. The farther the speaker diaphragm moves, the larger the pressure variation and the louder the perceived sound.
Phase: Phase describes where the wave is within its cycle relative to a reference point. If two waves have the same frequency and amplitude but one starts slightly later, they can look nearly identical while still being phase-shifted relative to one another.
Phase is not usually perceived directly by human hearing, but it is critically important in communication systems because it can carry additional information without changing frequency or amplitude.
The Anatomy of a Wave
Amplitude, frequency and phase describe the signal.
Learning note:
This visualization is an abstraction of the core terms. It simplifies the model on purpose, but real mastery of waves requires many more concepts, definitions, and edge cases than what is shown here.
y(t)=95×sin(2π × 3.0 × t + 0°)
How Does a Wave Carry Information?
The existence of a wave is not enough to create communication. A sine wave with fixed frequency, amplitude, and phase can transfer energy from one point to another, but as long as it remains identical over time, the receiver has no way to infer new information from it. Once the receiver identifies the waveform parameters, every additional cycle is expected to be the same as the previous one. In communication terms, the signal adds nothing.
Information is created when the transmitter chooses between possible states and the receiver can distinguish those states. That choice can be expressed as changes in frequency, amplitude, phase, or timing. For example, if the transmitter uses one frequency to represent 0 and another frequency to represent 1, the receiver can analyze the signal over each time interval and reconstruct the bit sequence based on the detected frequency. The same principle applies to amplitude, where a lower level can represent one value and a higher level another, or to phase, where multiple phase states can represent multiple bits per symbol.
From this, it follows that the wave itself is not the information. The information is in the transmitter’s controlled choice to change a specific wave property, and in the receiver’s ability to detect that change despite noise, distortion, and channel constraints. The mapping process between digital information and physical signal states is called modulation.
The amount of information represented by each symbol depends on how many states the receiver can reliably distinguish. With two states, each symbol carries one bit. With four distinguishable states, each symbol carries two bits. Sixteen states carry four bits. In general, if there are $M$ possible states, the number of bits per symbol is log2(M).
However, increasing the number of states does not provide information for free. As the physical distance between states becomes smaller, it becomes harder for the receiver to distinguish them after the signal passes through a noisy or distorted channel. For example, it is relatively easy to detect whether a specific frequency is present or absent, but harder to differentiate sixteen nearby amplitude levels after an audio codec has changed gain, compressed dynamic range, or introduced distortion.
That is why modulation selection is not just a question of how many bits can be packed into each symbol. It requires balancing data rate against state spacing, channel quality, and the receiver’s measurement capability. An efficient communication system is not the one that encodes the most bits per symbol, but the one that transfers the largest amount of information that can still be recovered reliably under real channel conditions.
Codec
A codec is a mechanism that encodes and decodes a digital signal, typically to make it suitable for transmission or storage. The term codec comes from the combination of encoder and decoder. On the transmitter side, the codec receives a signal, processes it, and produces a compressed or channel-adapted representation. On the receiver side, it performs the reverse process and attempts to reconstruct the original signal.
In audio, a codec may reduce information by removing or approximating details considered less important to human hearing. A lossless codec allows exact reconstruction of the original information, while a lossy codec sacrifices some information to reduce required data rate.
From the perspective of a covert communication system, the codec is not just an audio component. It is part of the channel. It can attenuate certain frequencies, alter amplitude, reduce phase stability, smear short-time changes, or remove spectral components it considers insignificant. As a result, a precisely generated transmitter-side signal is not necessarily the same signal that reaches the receiver.
Noise
Noise is any unwanted change added to the signal, or any distortion applied to it during transmission, reception, or processing. Noise makes it harder for the receiver to distinguish the states that the transmitter intended to generate.
Noise is not limited to audible background sound. It can come from many sources, including hardware limitations, quantization error, audio compression, mixing with other sounds, operating system processing, packet loss, gain variation, or timing inaccuracy.
For example, if one frequency represents 0 and another represents 1, noise can shift the measured frequency, attenuate it, or add energy at a nearby frequency. If the states are too close, the receiver may decode the wrong value.
Signal quality is often measured using signal-to-noise ratio (SNR), which compares desired signal power to noise power. The higher the ratio, the easier it is to distinguish symbols and recover information reliably.
Figure 2 - Visual support for the wave communication model
Time to Stop Guessing
One of the most common mistakes in engineering projects in general, and in Offensive Security research in particular, is the tendency to start building too early. It is easy to pick a modulation method that sounds promising, build a proof of concept, and start optimizing. The problem with this approach is that it assumes the channel will behave the way we expect it to.
In the case of an audio channel, that is a risky assumption.
By this point, it was already clear that the Citrix audio channel could carry information. The question was no longer whether it could be used, but how it should be used. In other words, it was time to stop guessing and start measuring.
This was also the point where I realized my goal was not to find the “best” modulation method, but to understand what information the channel could preserve across the full transmission path. The difference between those two approaches is substantial. The first starts from a solution and tries to fit it into the channel. The second starts from the channel and only then selects the appropriate solution.
At this stage, I began treating the audio path like any other communication system. If it is a communication channel, it can be characterized, measured, and bounded. So before making any engineering decision, I needed answers to a set of basic questions:
Which frequencies pass reliably through the full communication chain?
Is signal amplitude preserved, or does it drift along the path?
Is phase preserved consistently, or does processing alter it?
Are there frequency bands where the codec significantly degrades signal quality?
What is the shortest symbol duration that can be transmitted before the codec smears it in time?
Are the stereo channels preserved as independent channels, or do they mix during compression?
In practice, what data rate can be achieved without sacrificing reliability?
These were not theoretical questions. Each one led to an experiment, and each experiment influenced the final system architecture.
At this point, I also stopped looking at Citrix as a product. For me, Citrix was just one stage in a long processing chain. The signal did not travel directly from speaker to receiver. Along the way, it passed through the operating system, the Citrix audio subsystem, the compression codec, the transport protocol, the endpoint device, the local audio subsystem, and finally the recording stage through WASAPI. Every one of those components could alter, attenuate, or discard information from the signal.
In other words, the real challenge was not producing a sound wave. The real challenge was understanding which wave properties survive the entire path.
That became the starting point of the experiment series.
Instead of measuring only raw data rate, each experiment was designed to answer one question: can the channel preserve a specific signal property? The study examined frequency regions that survive codec passage consistently, long-term amplitude stability, phase behavior after channel traversal, the number of carriers that can be used in parallel, the effect of symbol duration on error rate, and the impact of switching between mono and stereo on throughput and reliability. Only after each of these questions had an evidence-based answer could design decisions begin.
In hindsight, most of the research time was not spent writing code. It was spent measuring. Every measurement eliminated several options, but also narrowed the solution space and clarified which decisions were truly compatible with the channel in front of us.
Only after the channel was characterized sufficiently could the communication system itself be designed.
And Then... Everything Broke
After several days of reading, understanding the core concepts, and building a mental model of the channel, I felt I was finally ready to begin.
I had a fairly clear picture of how information can be represented on top of a wave, which wave properties can be changed, and which principles modern communication systems rely on. On paper, all that seemed left was to choose a modulation method, write a bit of code, and start transmitting data.
In practice, almost all of my initial assumptions turned out to be partial, and sometimes simply wrong.
In hindsight, this was the most important phase of the entire research.
The transition from theory to a working system did not happen through one brilliant idea or a new algorithm. It happened through a long series of experiments, measurements, and small decisions, each of which forced me to abandon a previous assumption and adopt a better way of thinking.
More complex = better
That was probably the first assumption to break.
When you start reading about communication systems, it is very easy to be impressed by advanced modulation schemes. They can represent more bits per symbol, use bandwidth more efficiently, and reach much higher data rates. On paper, this looked like the obvious choice. In practice, the channel I worked with did not behave like a textbook channel at all.
Figure 3 - Theory breaks, measurement starts
As I went deeper, it became clear that the real question was not how much information can be represented per symbol, but how much of it survives the trip through the channel. At that stage, I still did not know which modulation would win. But it was already clear that the choice would not be based on how many bits could be packed into each symbol, but on how the channel actually behaves.
Fact 01
The best modulation is not the one that carries the most information, but the one that survives the channel best.
The channel decides. Not you.
At first, I was convinced I could choose any modulation method I wanted, and all that would remain was to implement it. In practice, almost every decision was made for me:
The channel decided which frequencies survive.
The codec decided which signal characteristics are preserved.
The noise decided how many states can actually be distinguished.
Fact 02
I did not choose the architecture. The channel chose it for me.
Figure 4 - The channel dictates architecture choices
Measurement beats intuition
At this stage, I had already understood something more important than any formula I had read. Almost every decision I tried to make from intuition turned out to be wrong.
More carriers did not necessarily increase the transfer rate.
More states did not necessarily increase the number of bits that actually made it through.
Even a modulation scheme that looked “inferior” in theory sometimes transferred more information, simply because it survived the channel better.
From that point on, I stopped asking, “What should work?” and started asking, “What do the measurements say?” That was probably the most significant shift in the entire research.
Fact 03
Measurements are always better than intuition.
Figure 5 - Measurement over intuition in channel design
Up to this point, the objective was to understand the channel. Only after reliable measurements started to accumulate was it possible to begin building the system itself. Almost ironically, the coding phase turned out to be relatively straightforward. The real challenge was understanding what the channel allows, and what it will never allow. Only then could all of those insights be translated into engineering decisions and a working communication system.
VDI Bridge
After a long period of learning, experiments, measurements, and course corrections, the result was no longer just a Proof of Concept that could push a single signal from one side to the other. It had become a full communication system.
VDI Bridge was not born as a finished idea. It evolved gradually, with each engineering decision serving as a response to a limitation exposed in the previous experiment. Compression was added to deal with the channel’s limited bandwidth. Error-correction mechanisms were added after it became clear that even a low error rate is enough to corrupt binary information. Later, interleaving was introduced after it became clear that errors were not random but appeared in short bursts. Even the shift between modulation methods was not driven by theoretical preference, but by how the Citrix audio channel and codec behaved in practice.
In the end, the system that was built included all the components you would expect in a modern communication system: compression, framing, synchronization, modulation, error correction, interleaving, validation, and recovery stages on the receiver side. Even though the physical medium was an audio channel, the design process was not fundamentally different from designing any other communication system.
VDI Bridge accepts arbitrary binary information, including files,
clipboard content and short control messages. The audio path carries
raw bytes rather than Base64-encoded text.
Input
Arbitrary binary data
Use cases
Files, clipboard and control
VDI Bridge transmission pipeline. Select a stage to inspect the
corresponding engineering decision.
What Is Worth Remembering From This Article
Offensive Security starts with questions, not tools.
Every system is a collection of communication channels.
Understanding the physics matters more than choosing the algorithm.
The codec was the real bottleneck, not the modulation.
Good measurements are worth more than good assumptions.
A simple system that works is better than a sophisticated system that does not survive the channel.
Almost every engineering decision was made after an experiment failed.
Writing the code was the easiest part of the project; understanding was the hardest.
When I look at VDI Bridge today, I no longer see a system that transfers information through sound. I see a learning process. The research started with a question about audio, continued through the world of digital communications, and ended with a new way of looking at systems. The speaker was only the starting point. The most important insight was that as long as there is a way to transfer information between two points, there is also a way to treat it as a communication channel. Once you start thinking that way, it becomes very hard to look at systems in any other way.
Looking For The Short Version?
This article is the full engineering deep dive. For the shorter overview focused on the mindset shift and the core lessons, read Audio Is Not Just Output. It Is a Channel.
]]>Daniel OzRogue Sandbox - When the Scan Itself is the Payload2026-07-05T00:00:00+00:002026-07-05T00:00:00+00:00https://danieloz147.github.io/2026/07/05/rogue-sandbox-when-the-scan-is-the-payloadTL;DR
Rogue Sandbox is not a sandbox escape; it is a trust-model abuse pattern inside legitimate browser boundaries.
The critical shift happens when users grant folder-level readwrite permission through File System Access API.
In this model, narrative design can make write-capable actions feel like harmless scanning or cleanup.
There may be no classic download moment, yet meaningful local file modification can still occur.
Chromium can route some write events into Safe Browsing or Download Protection logic, depending on file and policy context.
The defensive challenge is not only exploit prevention, but governance of browser-granted local file permissions.
Abstract
For years, we have treated the browser as an isolated execution environment. As long as there was no exploit, no downloaded file, and no local executable, the assumption was that a website’s impact on the user’s filesystem remained limited.
Modern Web APIs are beginning to blur that boundary. The File System Access API allows, after user approval, read and write operations over local files and folders. For Web developers, this is a legitimate capability that enables advanced in-browser applications. For an attacker, this is not a new vulnerability. It is a new trust pivot.
The trigger for this research was the Check Point Research article that demonstrated an attack path built entirely on the File System Access API, with no exploit and no local payload. Reading it raised a broader question: what happens when we stop framing this only as browser-based ransomware, and instead analyze the same primitive under a wider threat model?
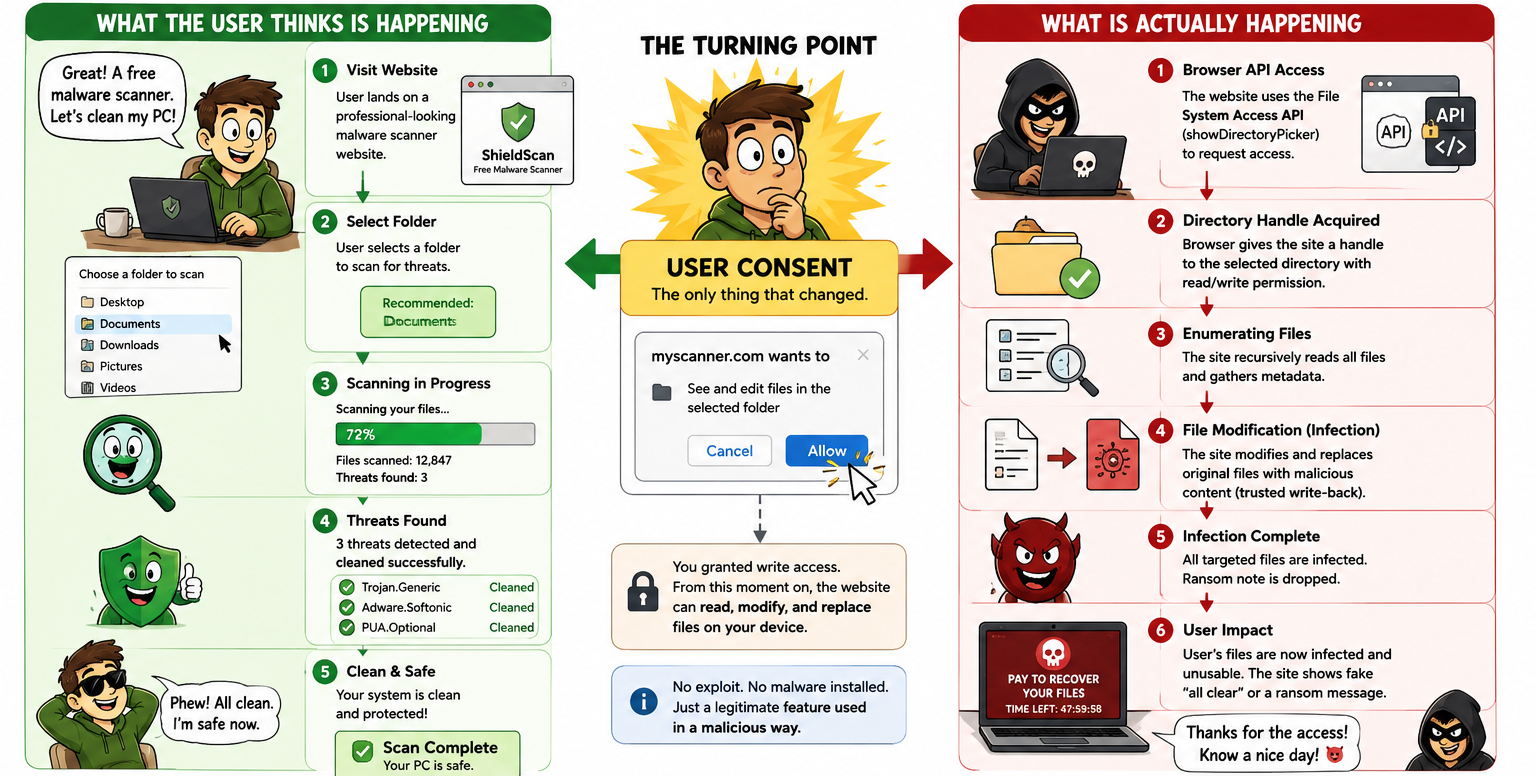
In this article, I present Rogue Sandbox, the research process that led to it, including failed attempts, Chromium constraints, and the relationship to Mark of the Web (MOTW). I then focus on a core insight from the work: in this scenario, there is not necessarily a “download moment”. From the user’s perspective, this is a scan action. From the browser’s perspective, this is write authorization. The gap between those two models is the starting point of this research.
Figure 1 - The entire article in one image
Research Scope
All demos, code samples, and projects presented in this article were developed strictly for research purposes and tested in a controlled lab environment on dedicated test files.
The goal of this work is to document the research process, findings, and insights that emerged during the investigation. If any third party chooses to use the code, ideas, or techniques described here for unauthorized or harmful activity, that use is their sole responsibility and does not reflect the purpose of this research or the author’s intent.
Credit to Check Point Research
Before diving deeper, it is important to provide explicit credit to the research that served as the starting point for this work.
In July 2026, Check Point Research published Browser-Only Ransomware: From LLM Hallucinations to a Practical Attack Technique, showing how an idea originating from LLM output can evolve into a practical attack technique built on the File System Access API. Their work demonstrated that combining social engineering, user-granted permissions, and native browser capabilities can result in local file modification without an exploit, without a local payload, and without bypassing operating system security mechanisms.
For me, that was the “what if?” moment. If a website can, after user approval, obtain write permission to a local folder and operate on files inside it, is browser-based ransomware really the main story? Or is it only one example of a broader trust model?
The Check Point article was the trigger for the research presented here. Everything that follows, from the initial PoC through Chromium source analysis to the Rogue Sandbox model, was driven by the attempt to answer that question.
Background and Motivation
To understand the risk, we need to start with the gap between how users perceive a scan action and how the browser’s permission model actually works.
Over time, average users have learned to be at least somewhat cautious around externally delivered files. An email attachment, an executable downloaded from the internet, or an Office document with macros is usually perceived as an unusual event that may indicate risk.
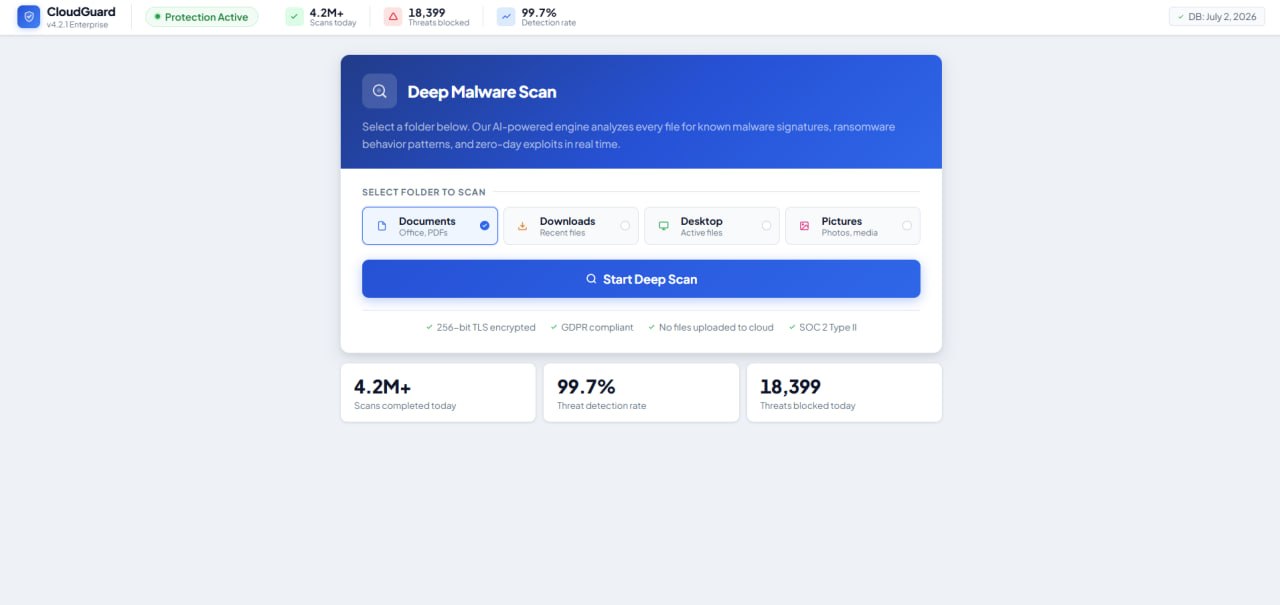
But when that same user visits a website that looks like a security tool, clicks Scan, and selects a folder through a legitimate system dialog, the suspicion model shifts. From the user’s perspective, this is not running foreign code or installing software, but activating a tool intended to protect their files.
That is exactly the key point.
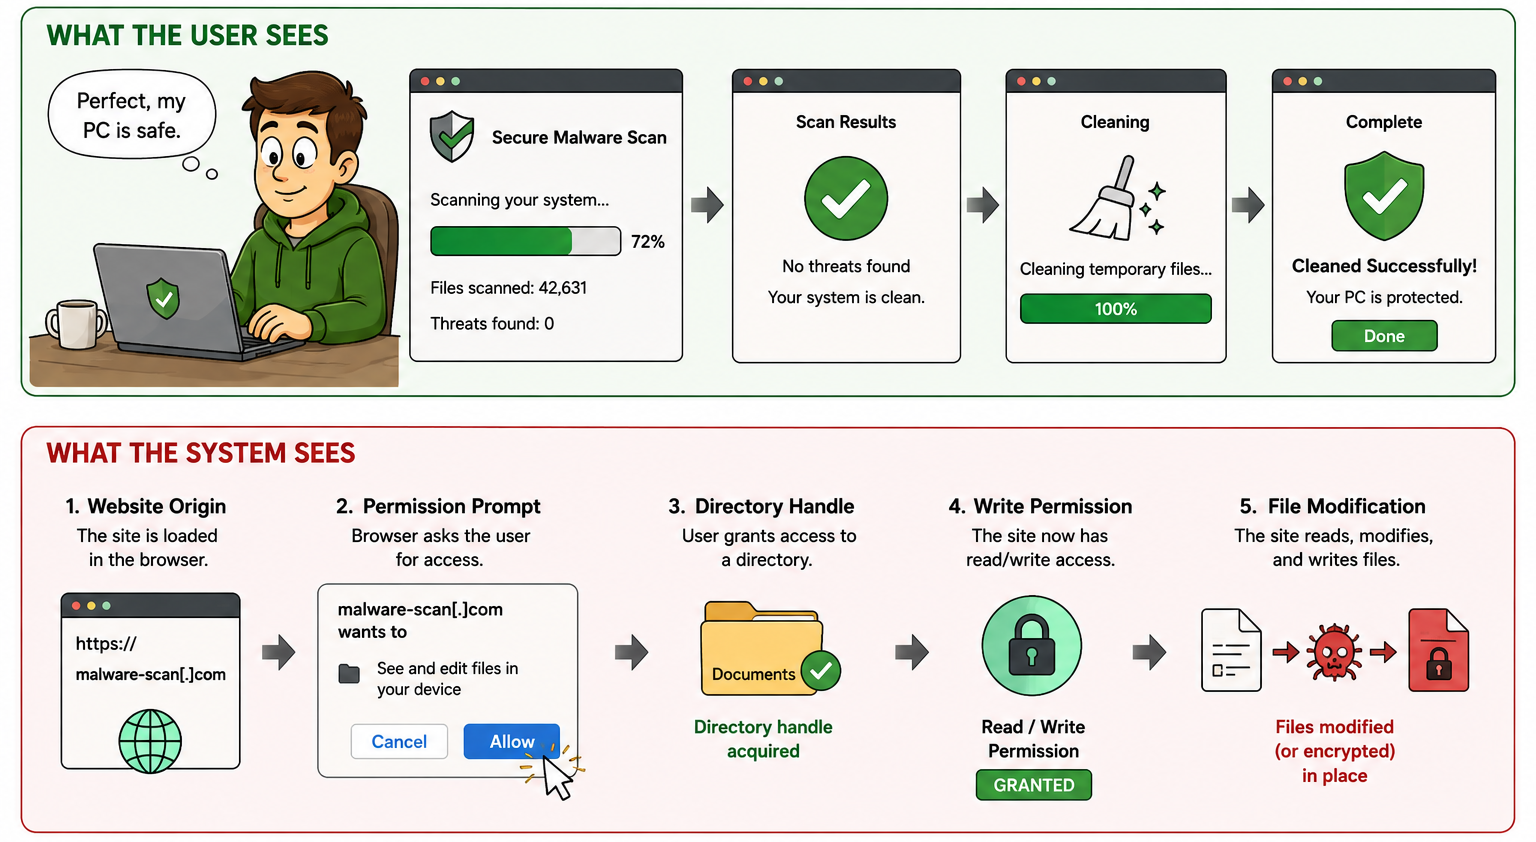
A legitimate scan flow and local file modification can begin with the same permission grant. If the site receives read access, it can map and analyze folder content. If it receives readwrite access, it can also modify files within that folder. From Chromium’s perspective, these are two levels of the same permission family. From the user’s perspective, both may look like a natural part of the scanning process.
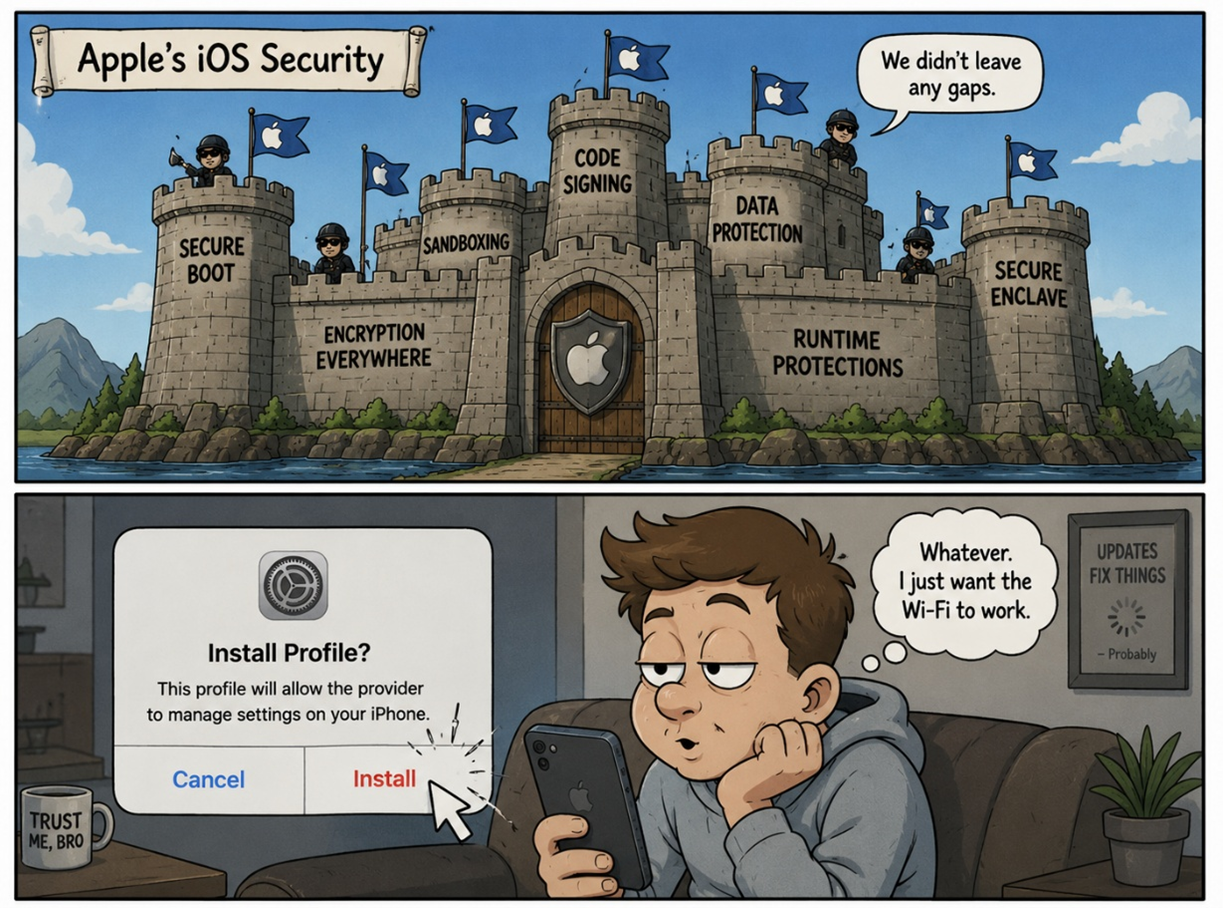
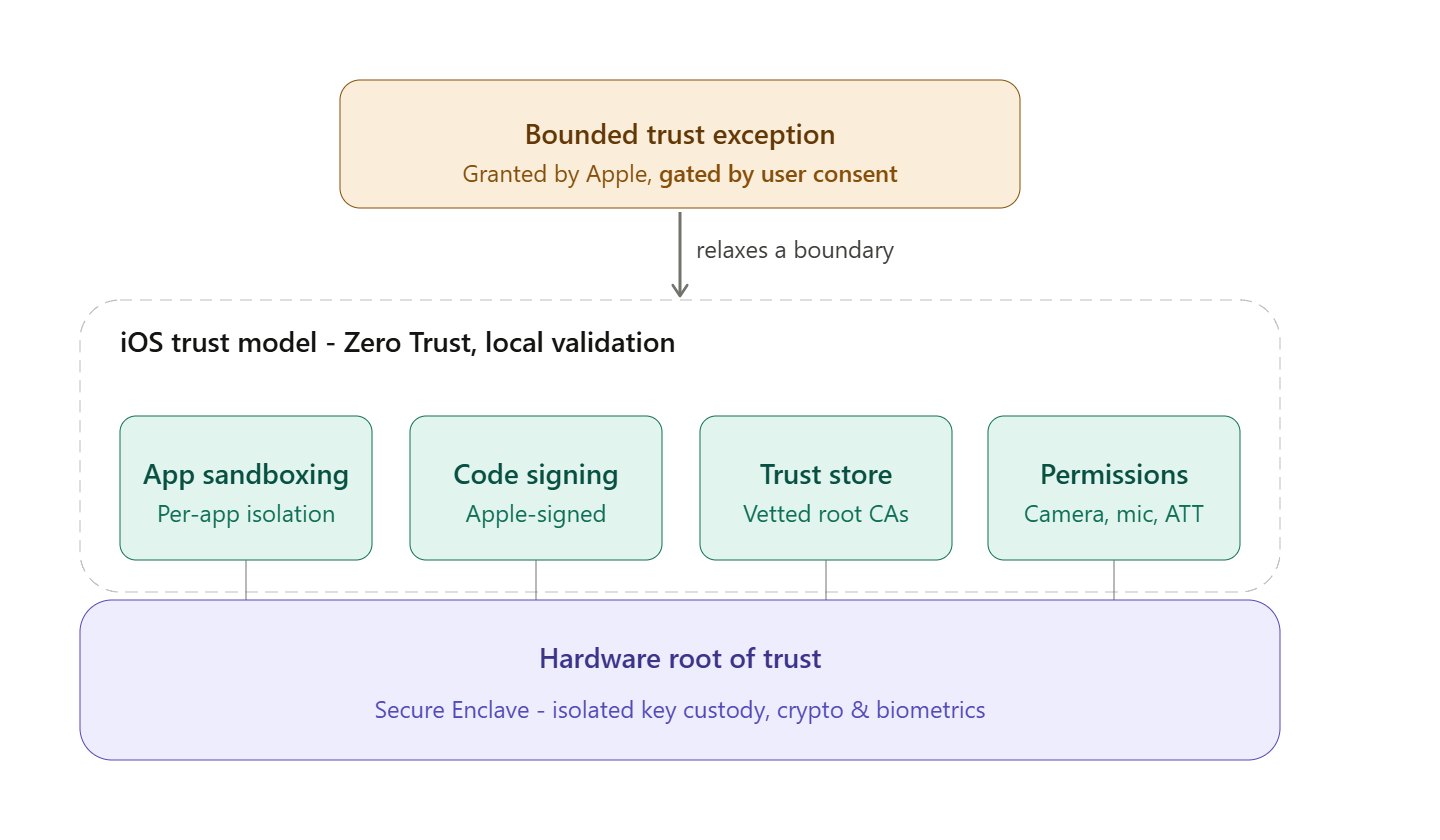
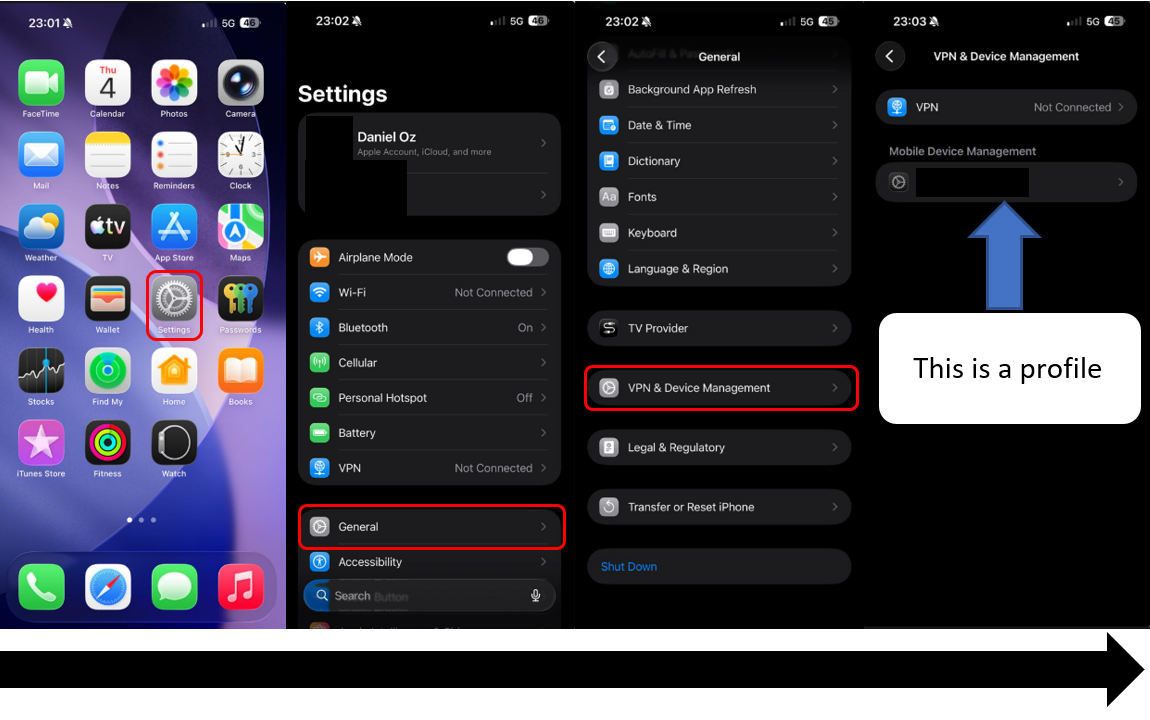
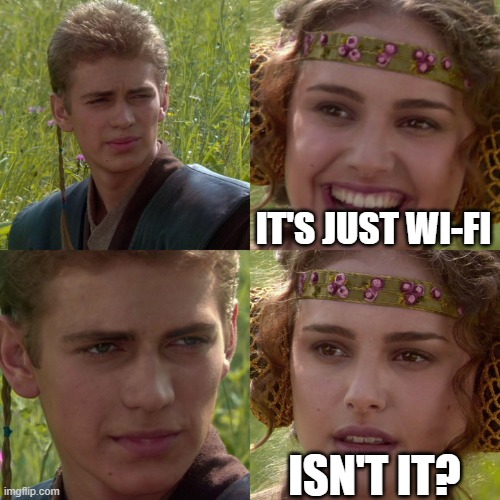
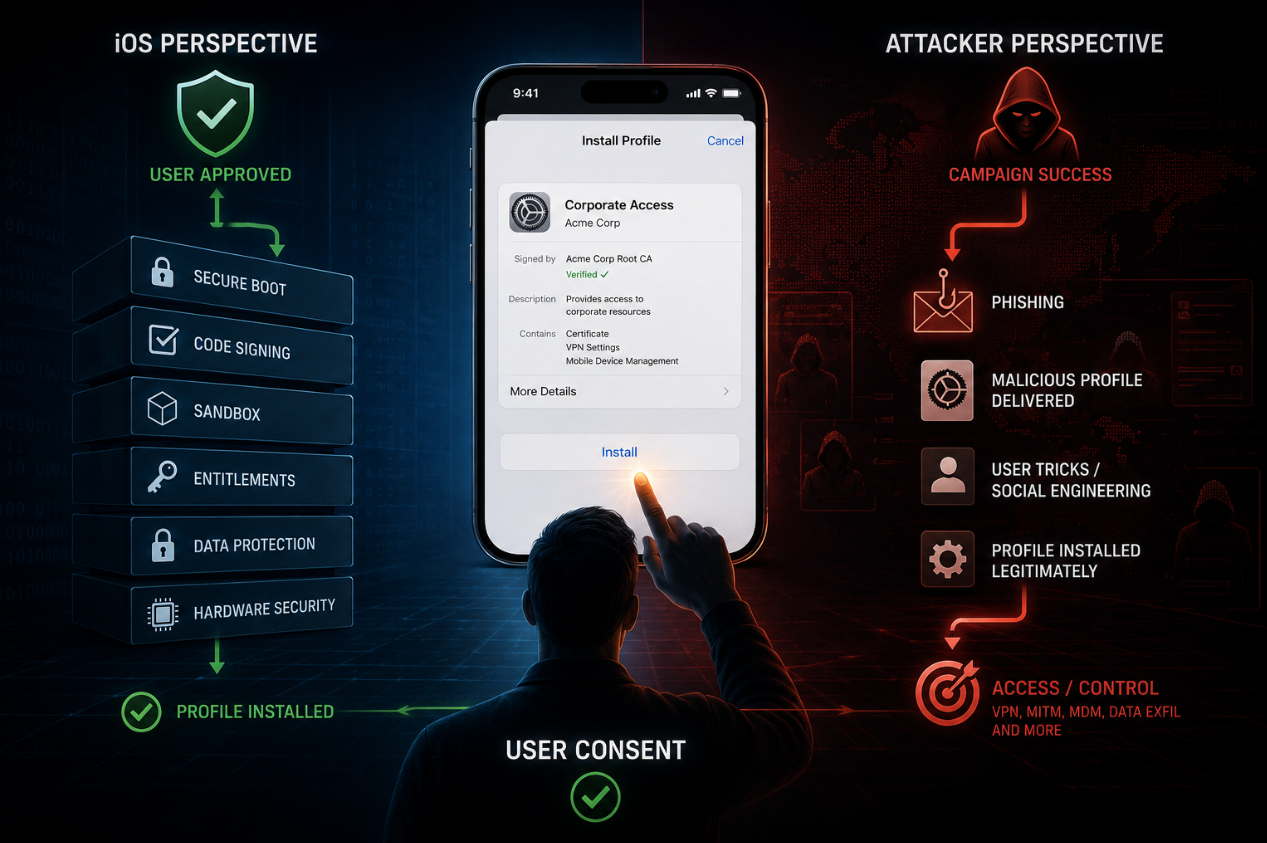
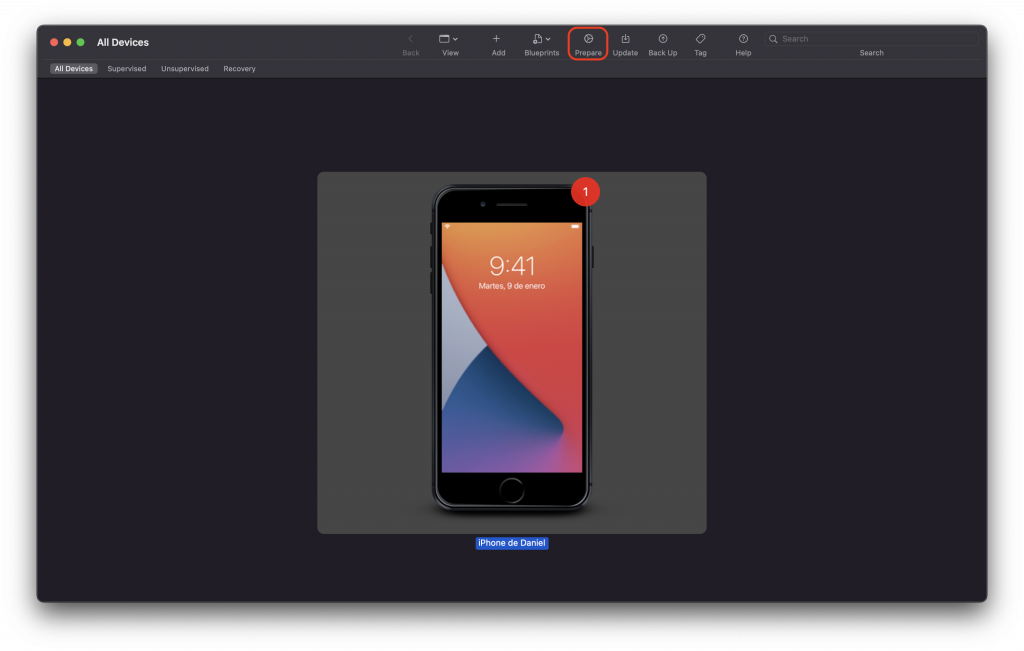
This transition echoes previous research focused on abusing trust mechanisms instead of exploiting software vulnerabilities. In my previous iOS article, I analyzed configuration profiles, a legitimate mechanism that allows users to expand the device’s trust circle. The core principle is similar here: not to bypass the sandbox, but to get the user to grant it permission.
Figure 2 - From the User to the System
The Idea
The Check Point demo used a lure that looked like an AI image enhancement tool. That was a highly logical choice. A user who wants to improve an image understands why the site asks for file access and even expects the file to change as part of processing. During my own research, I chose a different direction.
Instead of an AI tool, I built a flow that looked like a malware scanner. Not because this is the only possible lure, but because it allowed a more interesting research question: how does user behavior change when the user believes they are operating a tool that protects their files?
In that scenario, the user does not expect files to be transformed into a new output, as with image tools. The expectation is that files will be scanned, analyzed, and, when needed, “cleaned”. The defensive narrative makes the permission request feel even more natural. The user does not experience this as granting a website write access to a local folder. The user experiences this as allowing a security tool to do its job.
From the browser’s perspective, however, there is no difference between a site presenting itself as an AI tool, an image editor, or a malware scanner. Chromium does not evaluate the site’s story or declared intent. It checks whether the origin has the required permissions, and if so, allows operations that the API permits under that permission scope.
At that point, the question was no longer whether browser-based ransomware could be built. The question became whether it was possible to build a user experience in which a site perceived as a security product receives readwrite access while the user believes they only started a routine scan.
In other words, I was not primarily interested in whether browser-side encryption is possible. I wanted to understand how a fully defensive-looking narrative can lead users to grant write permission over their own files without experiencing the event as dangerous.
That led to the central research question in this article: can the File System Access API trust model be abused to modify existing files and inject payload content without the user experiencing the event as an infection?
The Question
The first question was simple: is this relevant to Chrome Desktop?
The answer was yes. The File System Access API is supported across multiple Chromium-based environments and allows opening a picker, obtaining a folder handle, and operating on files inside that folder according to granted permissions.
Once that was answered, the more important question shifted.
I was no longer asking only whether browser-based ransomware is possible. I was asking whether a believable scanner experience could be built while the browser receives readwrite permission and can modify local files inside the granted folder.
The research objective was therefore not to prove that browser encryption can happen. Previous work already demonstrated that. The objective here was to map the trust chain:
What story causes users to approve?
What does the browser actually show?
Where are the hard limits?
What happens on mobile?
What happens in non-Chromium browsers?
What happens with sensitive or system folders?
Does MOTW mark affected files?
Do defenses focused on downloads even classify this event the same way?
Why Rogue Sandbox?
Precision matters here - Rogue Sandbox is not another name for sandbox escape.
This is not a site breaking isolation boundaries, bypassing Chromium, or obtaining unrestricted filesystem access. The opposite is true. The model is interesting precisely because the browser remains within its intended boundaries: secure context, user gesture, picker flow, user-granted permission, browser support constraints, protected folder restrictions, and permission scope (read or readwrite).
Rogue Sandbox points to something else: a workflow the user perceives as safe.
In security terminology, sandbox typically describes an isolated environment where suspicious files are analyzed without risking the host. In this model, however, the user is not placing a suspicious file into an isolated environment. The user is placing an entire local folder into a web workflow that appears to be a scanner, while that workflow itself may become untrusted.
The user sees Scan. In practice, Write may occur.
The user sees Clean. In practice, Modify may occur.
The user sees Quarantine. In practice, the local file may be altered.
Rogue Sandbox is not a case where the browser escapes its sandbox. Rogue Sandbox is a case where the user puts files into a testing environment that appears safe, while that environment receives the capability to change them.
The Concealment Is Not Technical. It Is Narrative.
In this scenario, the user is not necessarily blind to what is happening. They see a website, a button, a folder picker, a progress bar, and status labels such as Analyzing, Uploading, Cleaning, Quarantining, or Repairing. The activity is often happening in front of them, not behind their back.
The problem is interpretation through narrative.
If the story is malware scanning, users expect file interaction. If the story is AI-powered malware cleanup, users may even accept file edits or repairs as normal behavior. That is exactly where permission becomes dangerous: the same prompt can be interpreted by the browser as “grant website write access” and by the user as “allow scanner to clean files”.
This is a critical point in the research. For the browser, the permission prompt is a formal consent event. For the user, it is often one step toward a promised outcome. If the promised outcome is protection, cleanup, or repair, write access may not be perceived as risky at all.
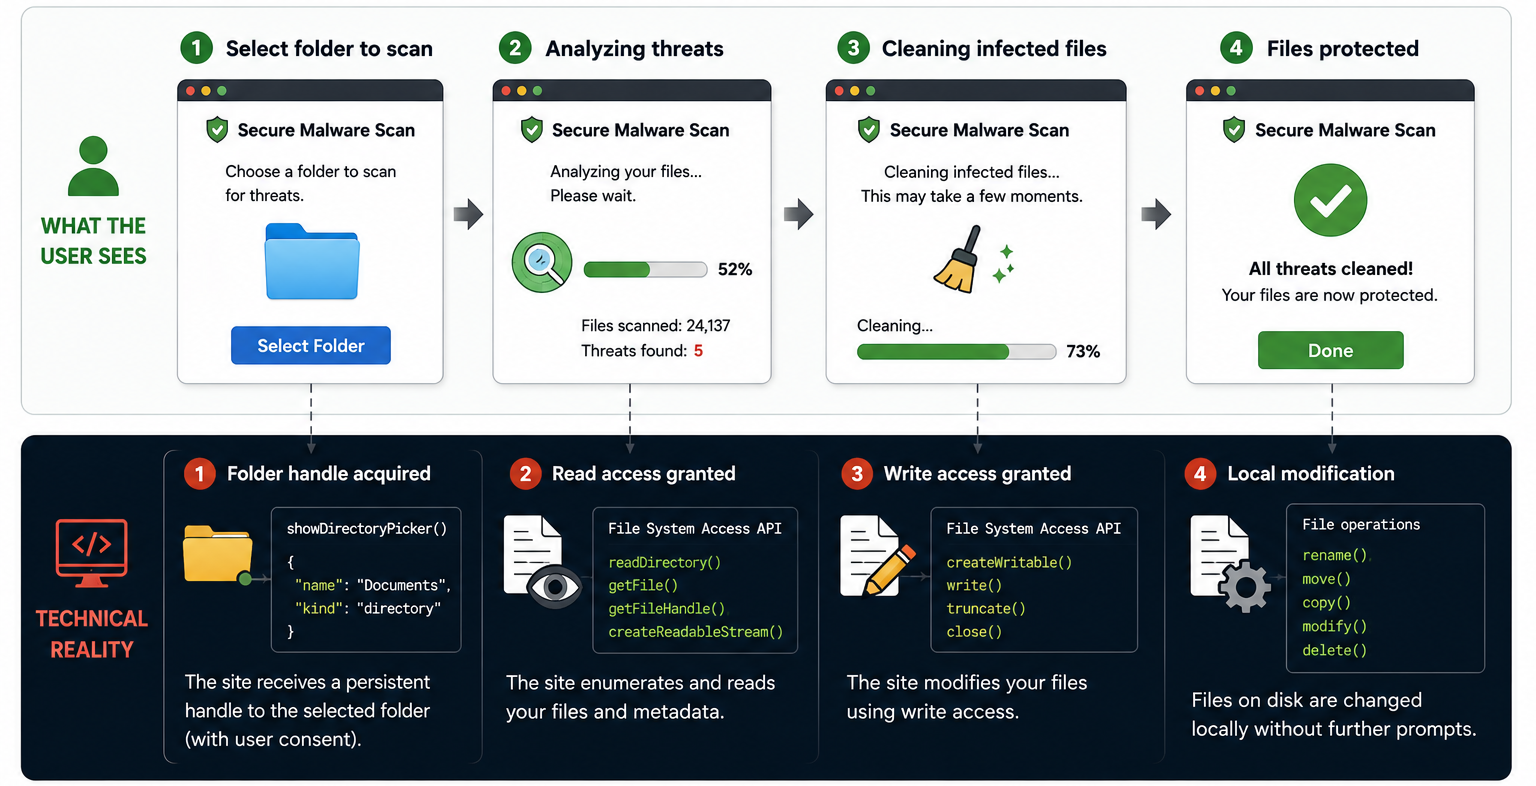
Figure 3 - The Story the User Sees vs. the Technical Reality
Deep Dive: File System Access API
What the API Enables Conceptually
The File System Access API was designed to let web applications work with local files in a richer way.
In the older model, a site typically received a file through input type="file" and could read it as a Blob. With the newer model, browser behavior is much closer to local applications: the user selects a file or folder, the browser returns a handle, and the app can perform actions based on granted permissions.
The most important point is that this API is not only about upload. After user approval, it enables reading files and saving changes directly back to local files and folders. When a folder is selected, an app can enumerate its content, iterate entries, request file and directory handles, and build a complete local processing flow.
For legitimate product use, this is powerful and useful. A browser-based code editor needs to open a project folder. An image editor needs to save edits to an existing file. A conversion tool needs to write outputs.
From an attacker’s perspective, the same mechanism creates a different story: the user gives a web process access to local files, and the boundary between scanning and modifying becomes a matter of developer intent.
At a high level:
User Click→showDirectoryPicker()→Directory Handle→Permission Granted→Writable Handle→Local File Modification
Pseudo-Code and Source-Level Perspective
// Safe defensive pseudo-code, not an implementation of file modification.if(!('showDirectoryPicker'inwindow)){showUnsupportedBrowserMessage();}button.addEventListener('click',async()=>{// Must be triggered by a user gesture.constdir=awaitwindow.showDirectoryPicker({mode:'readwrite',startIn:'documents'});constpermission=awaitdir.queryPermission({mode:'readwrite'});if(permission!=='granted'){awaitdir.requestPermission({mode:'readwrite'});}// Defensive lesson: this is the trust boundary.logSecurityEvent('origin received directory read/write access');});
Figure 4 - Chromium validates permission, not intent.
As shown above, the browser’s emphasis is the permission decision point, not the downstream implementation of file changes. In practice, browser logic is centered on status and request validation, not on whether the site’s intent is benevolent.
Key clarifications:
Secure Context and User Gesture
The API is not expected to run silently in the background. showDirectoryPicker() requires a secure context (typically HTTPS) and transient user activation, meaning an explicit user action such as clicking a button. If the call is not made from such interaction, the browser should block it.
This is an important safeguard, but it is not sufficient when the model depends on persuading users to perform a legitimate action.
In other words, the user-gesture requirement does not prevent phishing. It prevents automatic picker invocation without user action. If a site can convince a user to click a well-framed button inside a believable narrative, the requirement is satisfied.
Directory Handle, read, and readwrite
When the user selects a folder, the site does not receive a conventional absolute path. It receives a FileSystemDirectoryHandle. The handle represents the selected object and allows operations through the API.
The critical distinction is permission mode: read versus readwrite.
read allows reading and enumeration.
readwrite also enables persisting changes and, depending on implementation and permission scope, creating, modifying, or deleting files.
In the Rogue Sandbox scenario, readwrite is the core pivot. Without write access, the story remains scanning, metadata collection, or analysis. With write access, the same story can become fake cleanup, fake quarantine, fake repair, or direct modification of local files.
Primitive-to-Risk Mapping
Primitive
Legitimate Use
Risk Point
showDirectoryPicker
Select a folder for local work
User may select an overly broad scope
FileSystemDirectoryHandle
Represent the selected directory
The handle turns that directory into the site's working set
entries() / values()
Iterate files and subdirectories
Enables local content mapping within granted scope
getFileHandle
Access a file inside the selected directory
Operations can affect files the user did not evaluate individually
readwrite permission
Save edits or repair files
The critical transition from scanning to modification
Platform Scope: Not Universally Applicable
At this stage, one point is important to emphasize: this capability is not universal.
Chrome and Chromium are the center of this story. Firefox and Safari do not provide the same full model for showDirectoryPicker() and readwrite access over local folders. By contrast, Chrome/Chromium on desktop and Chrome on Android are the environments where this question becomes practically relevant.
What Happens Under the Hood in Chromium
The File System Access API is split across multiple layers:
The renderer process where JavaScript executes
Blink/Mojo interfaces
Browser-process components responsible for permissions and policy checks
Permission context logic
Filesystem backend services
In other words, once a site receives a handle, operations pass through a full browser enforcement chain.
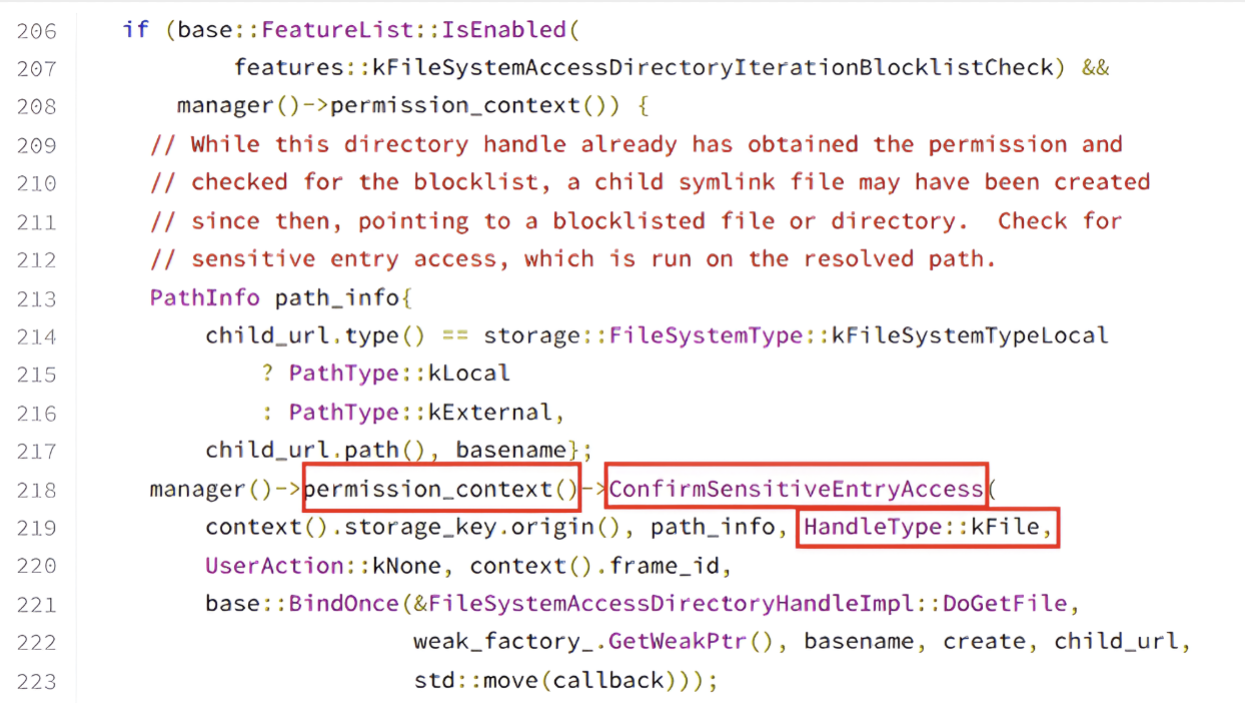
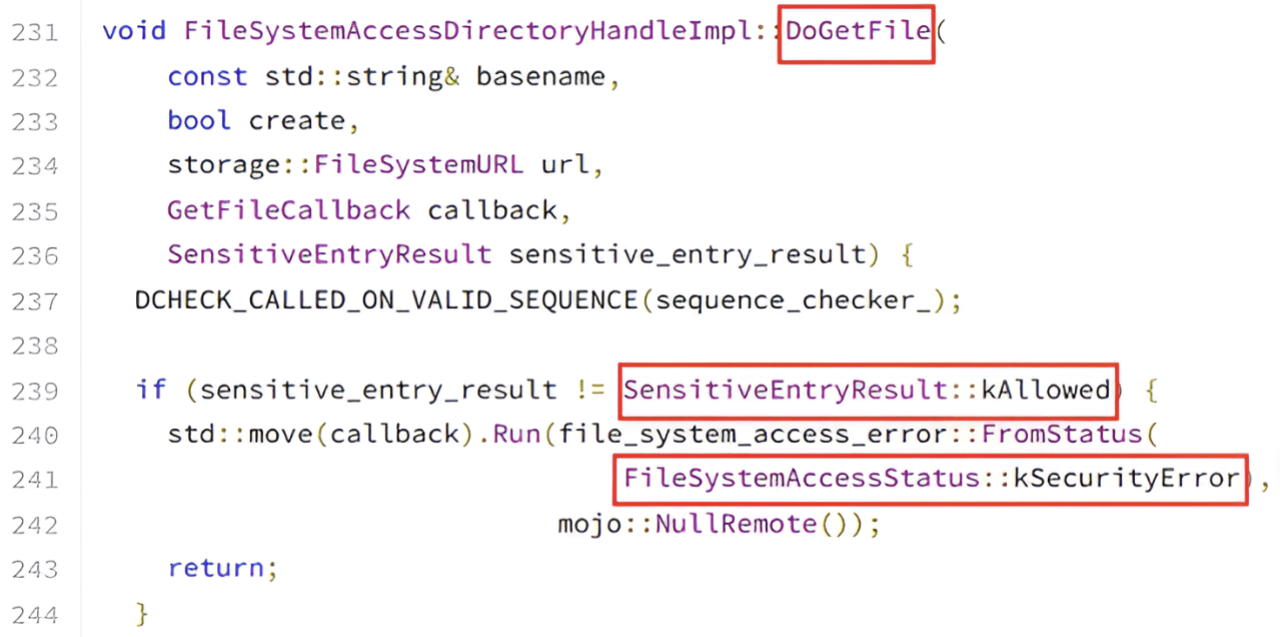
While reading Chromium source code, one of the most interesting points is how access to child entries and sensitive paths is handled. Chromium includes checks intended to prevent previously granted handles from being abused to reach problematic locations, for example via symlink traversal or a child entry that resolves to a sensitive location.
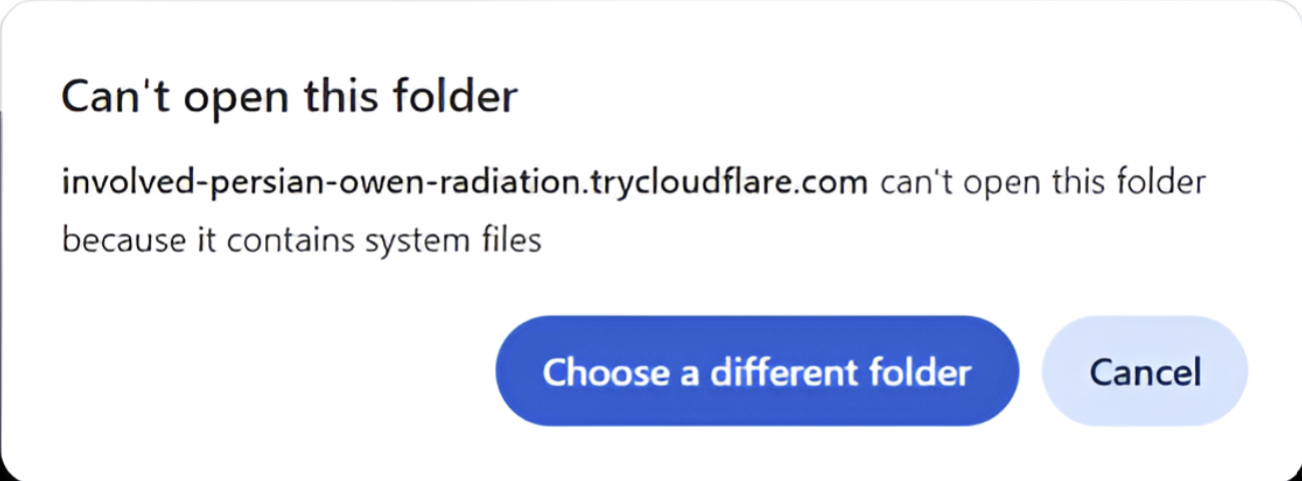
In those cases, sensitive-entry access checks are applied. If the result is not allowed, the operation may fail with SecurityError, or the entry may be filtered from results.
Figure 5 - Chromium performs an additional verification before returning access to file entries that may resolve to sensitive locationsFigure 6 - Chromium denies a handle when sensitive entry verification fails.
Research Conclusion
The browser does attempt to protect the user. This is not a simplistic “give me C:\ and done” model. There are real checkpoints in the flow.
However, those safeguards do not eliminate the core risk. If the user selects a non-sensitive folder that still contains high-value personal or business files, the API can still enable meaningful impact inside that granted scope.
Figure 7 - The error message shown to the user
An important point is that the most interesting part is not only that Chromium may return SecurityError in some cases. The key point is the boundary between directories treated as sensitive and ordinary user directories.
System directories, root locations, or browser profile paths may be blocked. But user-selected directories such as Documents, Downloads, Pictures, or a project folder may remain accessible. From an organizational perspective, that is exactly where business value resides, and exactly where an attacker wants to operate: working files, documents, deliverables, presentations, images, source code, and synced cloud files.
From Theory to Practice
Up to this point, the article has focused primarily on the File System Access API permission model, how Chromium enforces it, and the gap between how users perceive a scan action and how the browser interprets it.
At some stage, however, a theoretical model is no longer enough. If a website can obtain readwrite access to a local directory, and the browser validates permission rather than intent, the next question is what can be done with that permission in practice.
The first practical stage in my research was a lab-built browser-based ransomware prototype, inspired by the Check Point research. For me, this stage served as validation: it proved that the model works, that the browser allows the flow, and that a user can reach a state in which they grant write permission over local files without feeling that they executed foreign code.
Figure 8 - Ransomware and Encryption
For readers who want to review the ransomware validation code, the publication is available here: Browser-Based-Ransomware
The research direction quickly evolved beyond encryption. Encryption is a dramatic outcome, but it is not the core mechanism. The core mechanism is modification of an existing file under a user-granted permission model.
That shift produced the practical Rogue Sandbox question: can the same trust model be used to alter existing client-side files without the user experiencing the event as an infection?
In simple terms:
Browser-based ransomware was the trigger.
Rogue Sandbox is the model.
Client-side file infection became the research direction.
Client-Side File Infection
The central transition in this phase was moving from file encryption to controlled modification of existing files. Instead of modeling the browser as an actor that encrypts files and displays a ransom screen, I tested a different scenario: a website that looks like a scanner, receives write permission, modifies an existing local file, and writes it back to disk as a changed file.
The key point is that this is not a new-file download event. The user does not receive an executable from the internet, does not open an attachment, and does not run an installer. The user selects an existing folder from their own filesystem, and the full operation remains inside the browser permission model.
For demonstration, I used a controlled and minimal payload that only triggers a MessageBox. This choice was intentional. The objective was not to demonstrate destructive behavior, persistence, stealth, or complex payload engineering. The objective was to prove one specific point: an existing file can be modified so that the change is visible at execution time, and the chain starts with write permission granted by the user.
At a high level, the lab flow was:
The user opens a website presented as a scanning tool.
The site asks the user to select a folder for scanning.
The browser shows a legitimate folder picker.
The user selects a dedicated test folder and grants readwrite permission.
The site enumerates files in scope and identifies designated test targets.
Instead of introducing a new file, the site modifies an existing file within granted scope.
The modified file is written back to disk.
In controlled execution of the test file, a MessageBox confirms that the change persisted.
From a research perspective, this is the difference between download and trusted write-back. In the classic model, a new file enters the system from an external source. Here, a file that already exists on the system is modified through an action the user interpreted as scanning or cleanup.
This experiment was not meant to show arbitrary code execution by the browser. The browser does not gain unrestricted local execution, does not gain unrestricted disk access, and does not bypass Chromium isolation boundaries. The research is interesting precisely because it stays inside browser constraints.
The capability tested is narrower and clearer: after user approval, can a local file be read, modified in a controlled client-side process, and written back to its original location via the File System Access API?
That is why the technical emphasis in this section is the operation chain rather than sophisticated payload behavior:
Obtain a directory handle after explicit user approval.
Identify explicitly designated test files in a lab environment.
Verify persistence of the change after browser closure.
In full implementations, modification details are file-type dependent. For PE files, random byte edits are not sufficient. To keep a file valid after modification, the file structure, section boundaries, entry point behavior, and Windows loader interpretation all matter.
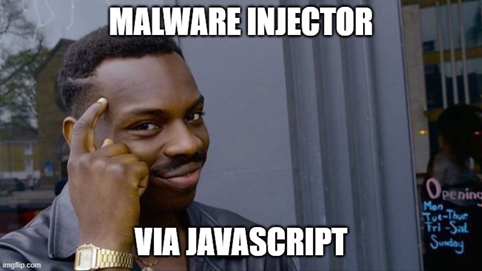
Figure 9 - Just think about it
Technical Limitations
During implementation, one point became clear quickly: client-side file infection is not trivial.
A browser is not a classic malware-development environment. There are memory limits, performance limits, API limits, browser-specific constraints, and full dependency on explicit user action.
In addition, not every file is a suitable candidate for modification. Signed files, structurally complex files, very large files, or files protected by security products may fail, be blocked, or break in a way that prevents execution. That is why the demo focused on controlled test files and a minimal payload.
The conclusion is not that every website can infect every file.
The conclusion is that the boundary between a web workflow and meaningful access to local files is narrower than many users assume.
Building the Story: The Narrative Is Part of the Technique
At this point, it is important to return to a non-purely-technical point that is still critical to the research: the story shown to users is not decoration. It is part of the mechanism that enables permission.
The File System Access API requires user action. A picker cannot be opened silently in the background without interaction. Because of that, the entire model depends on how users are persuaded to perform a legitimate action they believe belongs to a safe process.
This is why I built the flow around a malware scanner narrative. Users expect such a product to touch files: read, analyze, detect, and sometimes “clean” them. The word clean creates a psychological bridge between read and write. The user thinks in terms of repair. The browser evaluates write permission.
The full flow was designed around several UX principles:
Browser compatibility checks early in the process to reinforce product credibility.
Folder selection through native browser picker flows, not a classic upload pattern.
Language centered on Scan, Analyze, Clean, and Protect rather than Modify or Write.
Low, gradual threat counters to keep the experience plausible and non-theatrical.
Progress bars and action logs that look like routine scanner activity.
A positive completion state that signals “files are protected,” while file changes may have occurred.
The point is not that the user sees nothing.
The opposite is true: the user sees a lot, including process states, counts, and success messaging. The concealment is not the absence of UI. The concealment is that the UI frames technical actions as a different story.
That is narrative hiding.
The user sees “cleanup”. The system sees write.
The user sees “protected files”. The file sees modification.
Injection Architecture
The demonstration architecture was built around one simple principle: all meaningful processing happens client-side.
There is no local agent installation, no native binary execution, no browser exploit, and no JavaScript-to-native escape. The site runs inside the browser, uses the File System Access API, receives a FileSystemDirectoryHandle for a user-selected directory, and performs processing through JavaScript over files within granted scope.
In this model, the server is not the primary component. It can serve the website, support UI state, collect research telemetry, or host demo assets, but the file-modification process itself occurs in-browser.
Architecturally, the demo contains several layers:
Narrative layer: the website experience shown to the user.
Permission layer: picker interaction and handle grant.
Scanning layer: traversal of files under selected scope.
Filtering layer: selection of relevant test candidates only.
Binary-processing layer: file read as ArrayBuffer and validation.
Controlled-modification layer: deterministic change on suitable files.
Write-back layer: persistence to original location using granted write permission.
UI layer: action represented as scanning, cleaning, or repairing.
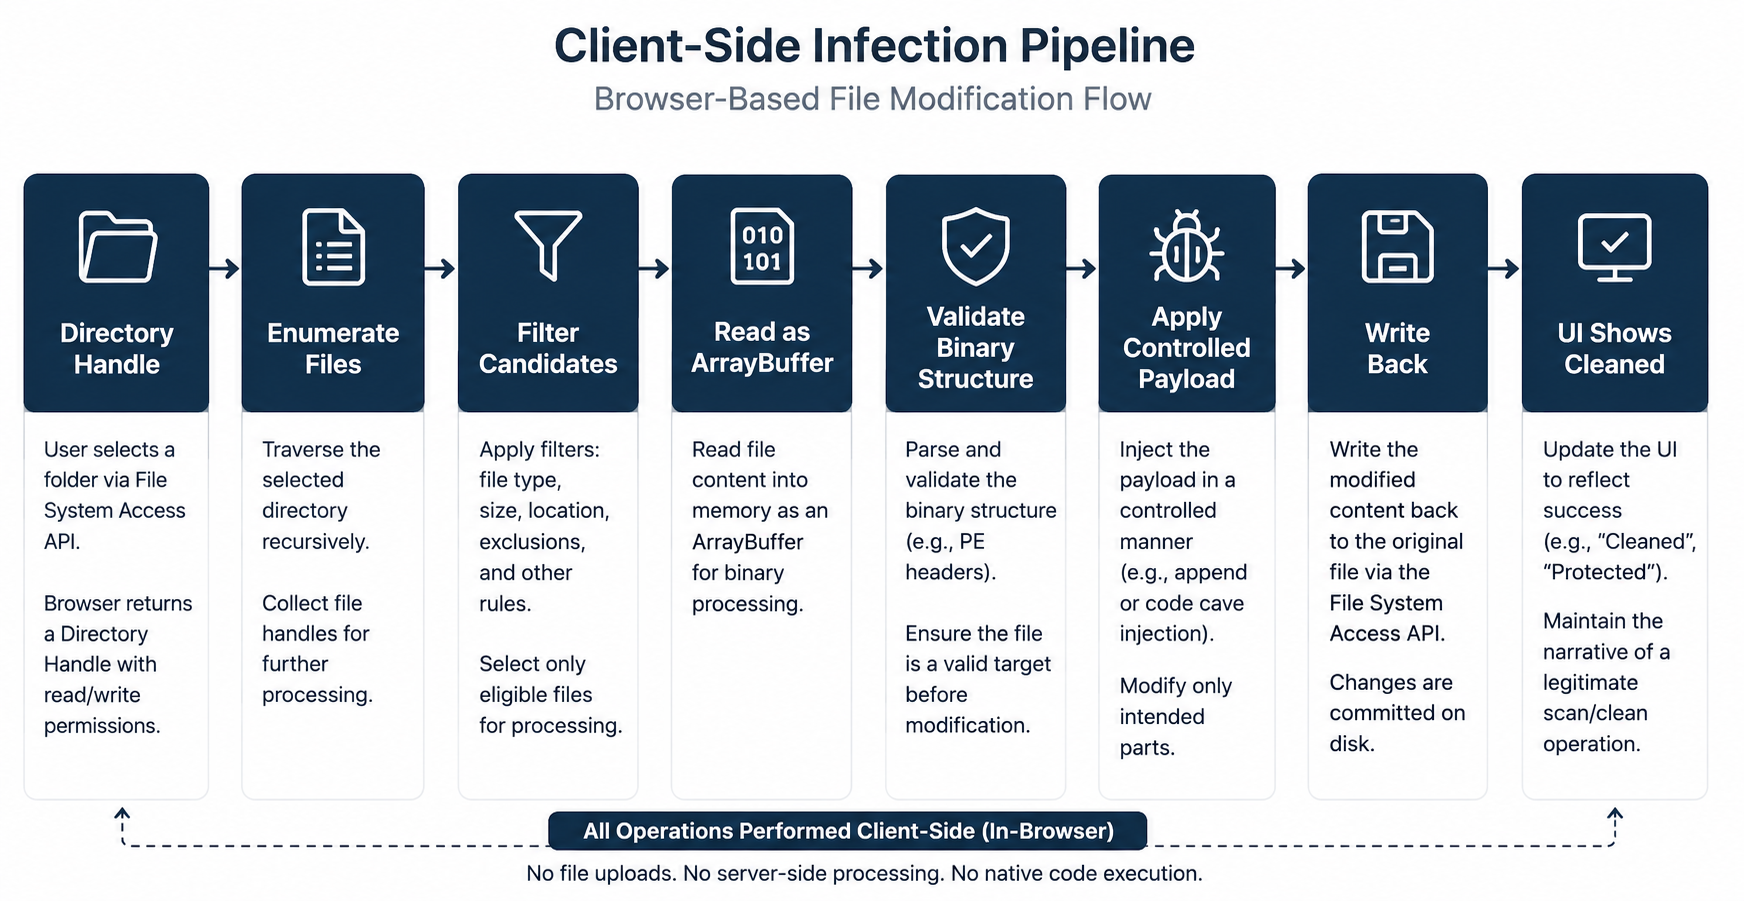
Client-Side Infection Pipeline
The central implementation element is JavaScript that performs client-side processing and controlled file modification.
This article does not publish a full operational infection recipe. The goal here is to explain the model, the architecture, and the constraints required for a browser-contained implementation to be feasible.
The pipeline starts only after the user selects a folder and the browser returns a FileSystemDirectoryHandle. From there, code iterates entries, checks which files are relevant to the research, and skips anything outside defined criteria.
That filtering stage is essential. Not every file is a viable candidate. Some files do not match the required format, some are too large for practical browser-side processing, some should be excluded by policy, and some are simply irrelevant to test objectives.
The implementation therefore used a fail-closed approach: if a file does not satisfy predefined constraints, it is skipped.
In practice, filtering considered parameters such as:
File type and extension.
File size thresholds.
Path relationship to selected scope.
Names and directories on explicit skip lists.
Files already processed.
Files that cannot be read or written.
Files whose structure fails validation checks.
Dry-run or test-mode state.
Only after passing filtering is a file read into memory through its handle. At that point, processing happens over ArrayBuffer or Uint8Array, i.e., binary representation in-browser.
For controlled demonstration, a MessageBox-only payload marker was used intentionally. The objective was not damage, stealth, persistence, or complexity, but a clear observable proof of behavioral change without introducing unnecessary aggression.
In short, MessageBox is not the end goal. It is a marker.
After processing, code creates a modified in-memory version and writes it back through the File System Access API itself.
There is no classic new-file download to Downloads, no attachment event, and no installer event. The browser uses origin-scoped write permission to open a stream and persist updated content into an existing local file.
This is where “no download moment” shifts from a psychological claim to a technical one.
From an attacker-visibility perspective, this is significant: the user did not download a new artifact. They selected a folder, initiated a scan-like workflow, and the local file changed in place.
What the Code Must Account For
The first constraint is environmental: the browser is not a natural malware-tooling environment. There is no unrestricted filesystem access, no arbitrary background execution without interaction, no full-disk visibility, and no bypass of Chromium policy boundaries.
Everything depends on what the user selected and what the browser agreed to expose.
Because of that, implementation must be defensive around handles, permission states, and errors. Any step can fail: the user can cancel selection, the browser can block sensitive directories, files can be locked, permission can remain read-only, or the API may not be supported in the current browser.
In the research implementation, each of these conditions had dedicated handling. That is not because it changes the core idea, but because it is what separates a theoretical concept from a functioning proof-of-concept.
A PoC cannot assume universal success. It must validate support, validate permissions, validate file candidates, skip exceptions safely, and preserve a stable user-facing flow even when only part of the scope is processable.
The second constraint is memory and performance. Browser-side binary processing relies on buffers and may involve large files. Practical implementations need size limits, staged processing, incremental UI updates, and avoidance of long main-thread blocking.
The third constraint is post-modification validity. If the objective is to demonstrate controlled infection, modified files need to remain valid enough to demonstrate behavior change. That means no blind writes: structure-aware processing is required to avoid immediate corruption.
Figure 10 - Client-Side Infection
The practical implication is that JavaScript is not “just UI” in this model.
It becomes a local processing layer that receives filesystem input, applies binary logic, and writes content back to disk through a legitimate browser permission boundary.
That is exactly where Rogue Sandbox becomes operationally meaningful.
The environment the user perceives as a scanner is not only presenting results. It can become a real processing environment. And once that processing environment holds write permission, the boundary between “inspection” and “infection” becomes fully dependent on the intent of code running in-browser.
Mark of the Web: When You Edit a File Instead of Downloading It
Research Credit
Sagi Olshansky raised the key Mark of the Web (MOTW) question that shaped this chapter.
One of the most important questions in this research was Mark of the Web (MOTW).
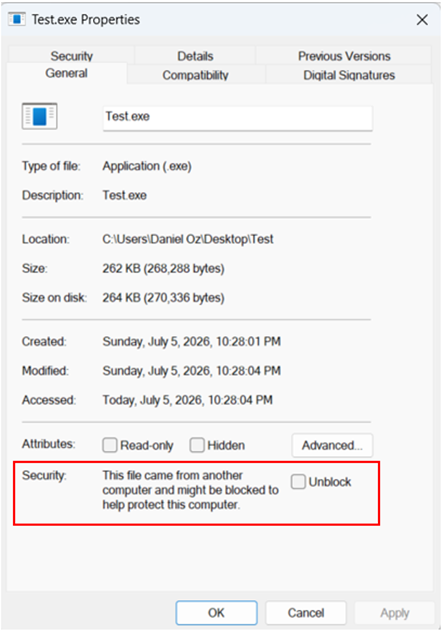
In classic Windows scenarios, when a file arrives from an untrusted source such as an internet download or email attachment, the system may mark it using Zone.Identifier. That marker is consumed by applications and security controls, for example by Microsoft Office when deciding whether to block macros in internet-origin files.
In the Rogue Sandbox scenario, the framing is different. There is not necessarily a newly downloaded file. Instead, an already-existing local file may be modified by the browser. The research question therefore became: is MOTW still relevant when the event is edit rather than download?
To evaluate this, I tested three separate cases:
A lab-created local file with no MOTW, then modified through the browser.
An internet-origin file already marked with MOTW, then modified through the browser.
A new file created or written by the browser through the File System Access API.
After deeper analysis, the core conclusion is that MOTW primarily answers a provenance question based on how the file is represented in its current filesystem state. Editing by a website does not automatically reclassify a file as internet-downloaded in the Windows trust model.
Figure 11 - Mark Of The Web
SmartScreen and What Happens When There Is No Download
One of the more surprising findings in this research appeared when testing write-back to existing files through the File System Access API.
Until that point, I treated this flow as outside the classic download-security path. The user did not download a new internet file. There was no download shelf event, no new artifact in Downloads, no Content-Disposition flow, and no event that looked like a traditional download.
At a high level, the sequence looked simple:
User selects a folder→Site receives write permission→Local file is edited in place
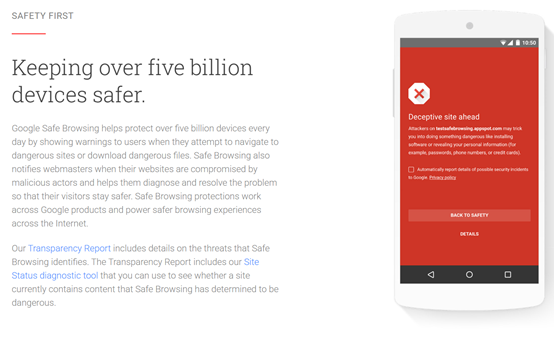
In practical testing against Chrome, however, the picture was more nuanced. In some cases, when the site attempted to write back specific files through the File System Access API, Chrome triggered protections associated with Safe Browsing / Download Protection.
This became an important point in the research because it challenged an early assumption: the absence of a classical download event does not necessarily mean the browser completely ignores file risk.
That is exactly where this chapter becomes interesting.
Figure 12 - Chrome Safe Browsing Error
Most people associate Safe Browsing primarily with phishing pages, malicious websites, or suspicious downloads. That is indeed a central part of the mechanism. Google describes Safe Browsing as a system that warns users when they attempt to visit dangerous sites or download harmful files and applications, and Enhanced Safe Browsing can apply deeper analysis options for downloaded content.
Chromium also includes a dedicated path that bridges File System Access write operations into the Download Protection stack. In Chromium source code, there are dedicated components such as check_file_system_access_write_request.cc and file_system_access_metadata.cc, and in download_protection_service.cc there is an explicit function named CheckFileSystemAccessWrite.
In other words, from Chromium’s perspective, writing through the File System Access API is not always treated as “just file editing”. It can be elevated into an event that passes through Safe Browsing / Download Protection inspection logic.
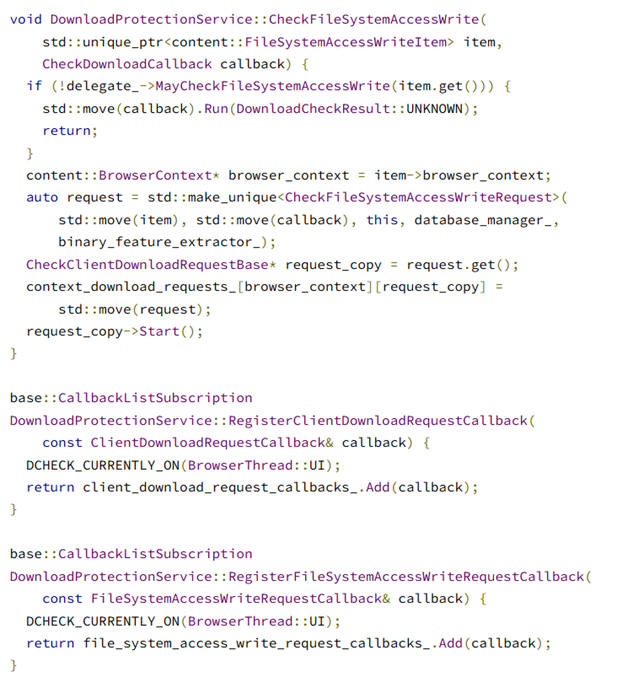
Figure 14 - CheckFileSystemAccessWrite
At this stage, Chromium receives a FileSystemAccessWriteItem, checks whether the delegate allows a protection check for that write operation, and if allowed, creates a CheckFileSystemAccessWriteRequest and starts the inspection flow.
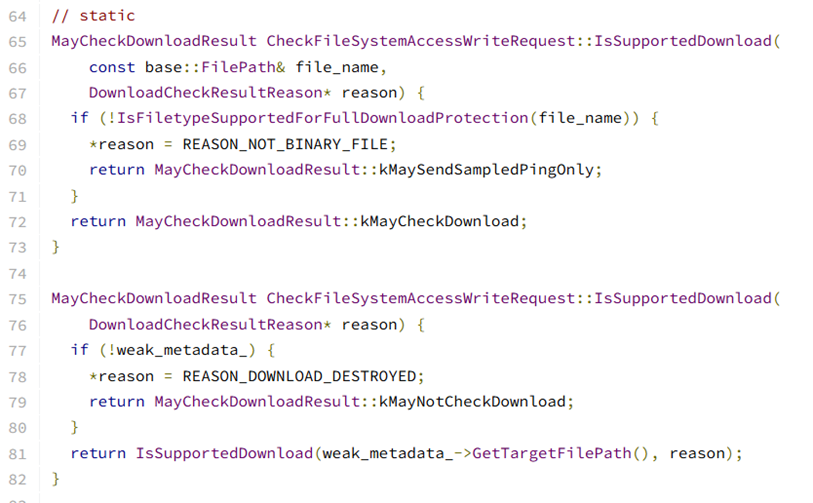
Figure 15 - The trigger is not only the origin. Chromium also looks at the written file as an object with type, path, metadata and policy context.
As seen above, the IsSupportedDownload path checks whether a file type is eligible for a full inspection route and may downgrade to a narrower path when it is not. As a result, not every write-back operation receives identical treatment. Chromium considers file characteristics, classification, policy constraints, and route eligibility.
In my research scenario, this constraint was handled through narrative design: content was represented under a non-EXE extension, and users were socially guided to restore the extension afterward.
Chrome vs. Edge
Both are Chromium-based, so the File System Access API layer is very similar at the web-platform level.
However, the reputation and protection layer is not identical. Chrome relies on Google Safe Browsing, while Edge integrates Microsoft Defender SmartScreen. Microsoft documents SmartScreen as protection against phishing/malware sites, suspicious applications, and potentially malicious downloads; Edge documentation also notes that relevant URL/file signals can be sent to SmartScreen services for reputation checks.
In my lab tests, Edge did not block folder-file access and editing in the same way as Chrome. Because of that, the client-side logic included browser-aware branching with a different narrative model per browser capability.
The research meaning is that the primitive is the same, but defensive response can differ. The same workflow can pass through different decision engines because each browser wraps Chromium with its own reputation, policy, and security UX layers.
Demo
Note that both videos show Rogue Sandbox.
In the first demo, executable-file editing is demonstrated through Microsoft Edge browser in a controlled lab context.
In the second demo, executable-file editing is demonstrated through Google Chrome browser with a non-protected extension narrative and controlled follow-up flow.
This is offensive research, but the defensive implications are unavoidable. If a browser can obtain write permission to a local folder and modify existing files under legitimate user consent, organizations should treat File System Access API as a permission surface with real security impact.
The point is not to block browsers entirely. File System Access API is legitimate and useful. The problem is that many organizations still model browsers mainly as upload/download endpoints, not as local-file editors.
Organizational Recommendations
Configure browser policy to limit or control site requests for read/write filesystem access.
Allow File System Access only for known and approved origins where business need is explicit.
Train users that folder permission is not equivalent to normal upload; it is permission to operate on local files.
Monitor browser processes writing to many files or changing sensitive extensions.
Treat file modifications by chrome.exe or msedge.exe as behavioral signals that require context.
Additionally, both Chrome and Edge provide enterprise policies to control how sites request filesystem read/write access. In organizations without a clear business requirement, blocking or tight allowlisting is worth considering.
Conclusion
Rogue Sandbox is not a sandbox-escape story. The browser did not break its boundaries. It operated exactly as designed: user gesture, folder selection, permission grant, and origin-scoped capability.
The issue is that users and browsers interpret the same event differently. The user sees scanning, cleanup, and protection. The browser sees handle, permission, and write. Rogue Sandbox lives in that interpretation gap.
The research started from browser-based encryption concepts and moved into a broader direction: if browser-mediated encryption is possible under user-granted scope, other controlled file modifications are possible too, including client-side infection demonstrations in lab settings.
The novelty is not that browsers are inherently “dangerous”. The novelty is that browsers have become local execution-adjacent environments driven by user-granted permissions. When credible narrative drives write consent, the scanning environment itself can become the payload path.
The user did not download a new file. The user allowed a site to edit a file that was already present. That is the distinction many defense models still fail to account for.
Research Notes
This section captures important observations that did not fit the main flow but are worth preserving.
Safari and Firefox
The full showDirectoryPicker() + local-folder readwrite model is not supported in the same way across all browsers. Safari and Firefox do not currently expose the same operational surface as Chromium in this context.
Chrome on Android
Check Point highlighted Chrome on Android relevance for media-folder scenarios. This research focuses mainly on desktop because controlled modification of existing executable formats is more relevant to Windows desktop workflows.
Sensitive Directories
Chromium does not provide unrestricted path access. It includes checks for sensitive directories and entries, including symlink-to-blocked-location scenarios. This model does not bypass those checks; it leverages user-selected, non-blocked areas.
startIn and Full-System Access
startIn does not grant root or full-system access. It only influences picker starting location. Actual access remains dependent on user choice and browser enforcement.
User Gesture
The user-gesture requirement is important but does not prevent social engineering. If users click Scan within a believable narrative, the technical requirement is satisfied.
Cloud Sync
A relevant future direction is synced folders such as OneDrive, Google Drive, or Dropbox. Browser-mediated local edits may be propagated by sync clients. This was not the primary attack case here, but it is an important follow-up direction.
Digital Signatures
Modifying signed files is expected to break signatures. This can become both a detection signal and a technical limitation. The current demo does not rely on signature bypass.
EDR Visibility
EDR products may observe chrome.exe or msedge.exe writing local files. However, absent rapid high-volume file churn, this activity may remain low-noise and under-classified.
Safe Browsing Is Not Only Phishing
The research indicates that Safe Browsing relevance extends beyond phishing-page and classical-download scenarios. Chromium includes dedicated write-inspection paths for File System Access operations, but behavior still depends on file type, classification, and browser policy.
Sources
Check Point Research - Browser-Only Ransomware: From LLM Hallucinations to a Practical Attack Technique
https://research.checkpoint.com/2026/browser-only-ransomware-from-llm-hallucinations-to-a-practical-attack-technique/
Chrome Developers - The File System Access API
https://developer.chrome.com/docs/capabilities/web-apis/file-system-access
MDN - File System API
https://developer.mozilla.org/en-US/docs/Web/API/File_System_API
WICG - File System Access specification
https://wicg.github.io/file-system-access/
Microsoft Learn - Macros from the internet are blocked by default in Office
https://learn.microsoft.com/en-us/microsoft-365-apps/security/internet-macros-blocked
Microsoft Learn - Microsoft Edge support for Microsoft Defender SmartScreen
https://learn.microsoft.com/en-us/deployedge/microsoft-edge-security-smartscreen
Microsoft Edge Policy - DefaultFileSystemWriteGuardSetting
https://learn.microsoft.com/en-us/deployedge/microsoft-edge-policies/defaultfilesystemwriteguardsetting
]]>Daniel OzExploiting the iOS Trust Model via Configuration Profiles2026-06-26T00:00:00+00:002026-06-26T00:00:00+00:00https://danieloz147.github.io/2026/06/26/exploiting-ios-trust-model-via-configuration-profilesTL;DR
You don’t always need a vulnerability to impact an iPhone. In many scenarios, social engineering plus legitimate iOS features is enough.
Configuration Profiles can expand device trust with explicit user approval, while the device still appears “secure” and uncompromised.
Malicious profile scenarios include forced trust changes (Wi-Fi, certificates, VPN/proxy/MDM settings) that alter traffic visibility and exposure.
The core risk is not a broken security boundary, but user-approved reconfiguration of trust.
Defense should focus on profile governance, user awareness, and continuous monitoring for unauthorized profile/certificate/MDM changes.
Abstract
iOS is considered one of the most secure mobile operating systems in the world. Over the years, Apple has built many layers of protection, such as Code Signing, Sandbox, hardware-based security mechanisms, and a relatively closed app distribution model. As a result, when talking about “breaking into an iPhone”, the discussion usually revolves around 0-Day vulnerabilities, complex exploitation chains, Jailbreaks, or advanced spyware of the kind typically associated with state actors or commercial companies with significant resources.
But what if you don’t need to break in at all?
In many cases, an attacker doesn’t need to bypass security mechanisms, exploit a vulnerability, or execute malicious code. It is enough to get the user to give the device an instruction to do exactly what it was designed to do.
This article focuses on one of the most interesting mechanisms in this context - Configuration Profiles, Certificates, MDM components, and additional system settings - which can significantly alter the device’s trust model and its exposure level, without the device being considered “compromised” in the conventional sense of the word, and while still operating entirely within the legitimate mechanisms of the operating system.
Throughout the article, we will examine how configuration profiles can be combined with social engineering techniques, what effects this may have on the user, how such scenarios can be identified, and what can be done to defend against them.
Ultimately, the central argument of the article is fairly simple. Sometimes the easiest way to affect an iPhone is not to bypass its security mechanisms - but to use them exactly as Apple intended. What is known in professional parlance as: “it’s not a bug, it’s a feature”.
Figure 1 - The entire article in one image
Background and Motivation
The smartphone has long since become far more than a communication device. It contains messages, photos, email, financial information, authentication factors (MFA), location history, and sometimes even direct access to corporate systems. For attackers, access to a mobile device can therefore be particularly valuable. In many cases, the phone is not the final target but rather the entry point (Initial Access) - at least to some degree.
When talking about “breaking into an iPhone”, the conversation typically centers around 0-day-level exploitation and advanced spyware. Not by coincidence - iOS is considered one of the most secure operating systems in the world, and Apple invests enormous resources in hardening it. As a result, much of the research and public discussion focuses on the question of how to bypass its protection mechanisms in one way or another.
But… what if you don’t need to exploit a vulnerability at all?
The purpose of this article is not to deal with memory vulnerabilities, bypasses, or sophisticated exploits. Instead, we will examine a much simpler question - can significant impact be achieved against an iPhone without exploiting a vulnerability, without bypassing a security mechanism, and without compromising the operating system?
As we will see, the answer has less to do with lines of code and more to do with the relationship between the user and the device. After all, iOS is built on a strict trust model.
But there is one factor that operates outside those hardening mechanisms.
A factor that almost always makes the final decision.
The user.
Author’s note: During the writing of this article, no Apple security mechanisms were harmed. A number of hypothetical users, however, did click the Install button without reading a single one of the warnings presented to them.
Figure 2 - Sometimes the easiest way to bypass a security mechanism is to not bypass it at all
The iOS Trust Model
Before discussing Configuration Profiles, MDM, or what certificates actually are, one fundamental concept needs to be understood - most security mechanisms in iOS are designed to prevent applications, files, or external attackers from performing actions that have not been authorized by the operating system. But what happens when the action was authorized by the user themselves?
If I had to describe a relatively conceptual “diagram” of the general trust model that the iPhone’s operating system relies on, I would describe it roughly like this:
Figure 3 - Conceptual diagram of the iOS security layers
The Three Layers (Base to Top)
The Purple Layer - Root of Trust:
This layer represents the device’s hardware root of trust. Mechanisms such as the Secure Enclave, Secure Boot, and cryptographic key management are designed to ensure the device boots from a known and unmodified trusted state.
The Green Layer - Trust Enforcement:
This is where mechanisms such as Code Signing, Sandbox, Trust Store, and a complete access permission model reside. Their role is to ensure that applications and code cannot perform operations the system has not pre-approved, and that unauthorized code cannot run or gain access to system resources.
The Orange Layer - An Exception, but a Controlled One:
This is where the story of this article begins.
iOS’s model is Default Deny, but in certain cases Apple allows the user to expand the device’s circle of trust. This expansion does not break the security mechanisms and does not bypass them - it operates through them, with explicit user approval. This expansion is carried out using Configuration Profiles.
In other words, most iOS security mechanisms are designed to restrict what code can do. Configuration Profiles are interesting for a different reason - they allow the user to add components, settings, and identities that the system would not have trusted by default.
So What Are Configuration Profiles, Exactly?
Figure 4 - Most iPhone users will never reach this screen. Some who do don't really know why.
For most iPhone users, this is one of the least familiar features in the operating system. Many users will never encounter it during their device’s lifetime. Those who do typically belong to one of two groups:
Employees in organizations that use MDM systems.
People who clicked a link they weren’t entirely sure, in hindsight, they should have clicked.
Configuration Profiles are not a security mechanism - practically speaking, they were born out of an operational need. When organizations began adopting iPhones at scale, a problem emerged: how do you configure hundreds or thousands of devices without going through each one manually?
A typical organization needs to configure for its employees:
Corporate email accounts
Digital certificates
VPN connections
Wi-Fi networks
Security restrictions
Password policies
Additional organizational settings
Performing all of this manually for thousands of employees is not practical. To solve this problem, Apple introduced a mechanism called Configuration Profiles. Instead of asking the user to configure each component individually, a file can be sent to the target device that tells the operating system exactly which settings to apply.
Technically, a Configuration Profile is a signed (or unsigned) text file with a .mobileconfig extension. It is an Apple Property List in XML format that represents various Payloads - where each Payload can be thought of as a single “configuration unit”.
For example:
Profile
Wi-Fi Settings
VPN Settings
Certificate Settings
Hardening
and many more...
Each setting is responsible for a different component of the system. Behind the scenes, from the operating system’s perspective, a Configuration Profile is essentially a list of instructions to execute. For example:
<?xml version="1.0" encoding="UTF-8"?><!DOCTYPE plist PUBLIC "-//Apple//DTD PLIST 1.0//EN" "http://www.apple.com/DTDs/PropertyList-1.0.dtd"><plistversion="1.0"><dict><key>PayloadContent</key><array><dict><key>AutoJoin</key><true/><key>EncryptionType</key><string>WPA2</string><key>HIDDEN_NETWORK</key><false/><key>Password</key><string>[WIFI PASSWORD TRUNCATED]</string><key>PayloadDisplayName</key><string>Wi-Fi</string><key>PayloadIdentifier</key><string>com.example.profile.wifi.0</string><key>PayloadType</key><string>com.apple.wifi.managed</string><key>PayloadUUID</key><string>B1E2F89C-C8BF-4F4E-8B05-4F19E618A368</string><key>PayloadVersion</key><integer>1</integer><key>SSID_STR</key><string>[SSID NAME TRUNCATED]</string></dict></array><key>PayloadDisplayName</key><string>Configuration Profile</string><key>PayloadIdentifier</key><string>com.example.profile</string><key>PayloadOrganization</key><string>OrgName</string><key>PayloadType</key><string>Configuration</string><key>PayloadUUID</key><string>8DA0EF1E-6AD4-4B68-A2BB-EDA3E55067E2</string><key>PayloadVersion</key><integer>1</integer></dict></plist>
Technical breakdown of what we see here:
What is shown above is a Configuration Profile in .mobileconfig format - in practice, an Apple Property List in XML format that defines a configuration profile for an iOS device. The settings are written in Key-Value format.
In this case, the profile contains a single Payload - a managed Wi-Fi setting.
This tells iOS that this is a Wi-Fi setting the system should add to the device. After installing the profile, the device will recognize a specific Wi-Fi network - including its name, encryption type, and password.
Structurally, there are two layers:
Configuration Profile
Payload Content
Wi-Fi Payload
The outer layer is the profile itself (PayloadType: Configuration) - a general wrapper indicating this is a configuration profile. Inside it is PayloadContent, an array of Payloads. In this case there is only one, but theoretically the same profile can contain multiple Payloads together.
Within the Wi-Fi Payload:
SSID_STR - the name of the network the device will connect to
Password - the network password. In a real profile, the password appears as part of the file in plaintext, making it highly sensitive information. Anyone holding the .mobileconfig file may be able to see the password if the profile is not properly protected or encrypted
EncryptionType: WPA2 - the network’s security type
AutoJoin: true - the device will automatically attempt to connect to the network when it is available
HIDDEN_NETWORK: false - the network is not hidden, meaning the SSID is broadcast normally
PayloadIdentifier / PayloadUUID / PayloadVersion - Apple metadata used to identify and manage the Payload
At this stage, this is still a relatively benign example. All we did was ask the operating system to save a network and connect to it automatically. But once you understand that the user can cause the device to accept new network configuration settings, it becomes interesting to ask what that decision means in the real world.
The key takeaway: the user is not typing a Wi-Fi password. They are installing a profile that tells the device how to behave toward a specific network. And that is the interesting difference:
In a legitimate scenario - an organization distributes Wi-Fi settings to employees.
In a scenario exploited by an attacker - they can cause a user to install a profile that looks like “Conference Wi-Fi” or “Secure Network Access,” and in practice cause devices to connect to a Rogue AP. From there, a range of attack types becomes possible:
Visibility - the device connects to a network under someone else’s control. Consider the intelligence value of knowing:
When the user arrived
How long they stayed
How many devices connected
Which services the device is trying to reach
Attack Surface Discovery - when a device is on a given network, it may expose services accessible only via Wi-Fi (depending on organizational configuration):
Device names
Service Discovery
DNS requests
Internal domains
Network topology clues
Credential Harvesting Opportunities - additional attacks can be launched to extract information from the victim:
Captive Portals
Fake Login Pages
Dangerous combination with additional Payloads - Wi-Fi is one specific Payload, but it can potentially be combined with other Payload types to create a more complex attack chain:
Wi-Fi auto connect→Root CA installation→Fake Corporate Portal→Credentials collection→MITM with TLS inspectioneffectiveness depends on Certificate Pinning implementation
It is important to remember that behind an innocent Install button lies a direct instruction to the operating system: “Add this network, save the password, and connect to it automatically when you see it”. On their own, Wi-Fi Payloads do not grant an attacker access to the device and do not constitute a breach of the operating system. However, their combination with additional Payloads allows an attacker to influence both the device’s communication environment and its circle of trust. In such a state, it becomes possible to create an environment that appears completely legitimate to the user - including corporate portals, authentication services, and various access interfaces - without triggering the familiar warning mechanisms the user expects to see when accessing an untrusted site.
In this sense, the Certificate is not the target - it is the tool that makes the rest of the chain appear trustworthy. Not control over the device, but the ability to make the user stop questioning what they see. That is already a significantly more meaningful impact than just another Wi-Fi connection.
Figure 5 - Even iOS tries to hint at you
Signed or Not Signed? That is the Question
One of the first questions that comes up is whether a Configuration Profile has to be signed.
The short answer is: No.
iOS allows the installation of unsigned profiles as well. While a signed profile allows the operating system to verify its origin and integrity, an unsigned profile will only display an appropriate warning to the user during the installation process.
It is important to understand - the warning does not prevent installation, it only informs the user of the risk in a general and abstract way. As we will see, this can even be exploited.
At this point I want to clarify an important distinction: a profile is not Malware, it is not ShellCode, not a RootKit, and not an Exploit. It is simply a relatively automated way to perform actions through official, documented mechanisms of the operating system. This is also why using it is so interesting - it does not attempt to bypass iOS’s security model, but rather operates within it.
So where is the problem?
From the operating system’s perspective, the process is straightforward:
The user received a profile.
The user chose to install it.
The user read the warnings.
The user approved the action.
The profile was installed.
From the attacker’s perspective, the process looks slightly different:
Get the user to receive a profile.
Get the user to install it.
The fun begins.
The rest is handled by the operating system.
Figure 6 - Distribution vectors for a malicious profile
Anatomy of a Configuration Profile
Before we try to convince a user to install a profile, it is worth understanding exactly what we are installing. Behind the “Install Profile” screen hides, at the end of the day, a fairly boring XML file. And as with many stories in the cyber world, the boring things are usually the most interesting.
Not all Payloads are equally interesting. Some are designed for convenience, some for management, and some can significantly alter the device’s trust model.
The following table details the possible Payload types available, as of the time of writing, through Apple. It is not intended for studying each Payload individually - its purpose is to illustrate the breadth of the Configuration Profiles mechanism and the variety of system components that can be configured through it.
AirPlay/AirPrint can add attacker endpoints; font payload is a minor file-delivery vector
One thing worth noting: not all Payloads in the table are available in every scenario. Some require Supervision - a special state activated through Automated Device Enrollment (ADE) or Apple Configurator with a physical connection to the device. ★ supervised marks these in the table above.
The practical implication is that an attacker distributing a Configuration Profile to a personal device does not automatically gain access to these capabilities. In this sense, the Supervision requirement serves as an additional layer of protection and significantly limits the scope of actions that can be performed via a manually installed profile.
It is important to note that the Supervision requirement does not make a particular Payload irrelevant from an offensive perspective. However, such scenarios require significantly different starting conditions and are not the focus of this article.
So How Do You Actually Create a Configuration Profile?
During the research, one of the first questions that came up was how to actually create such a profile. Officially, Apple has provided tools over the years such as iPhone Configuration Utility and later Apple Configurator, designed to assist in managing and configuring devices. These tools work well, but depend on using Apple’s own products.
Figure 7 - A CA Certificate as a strategic assetFigure 8 - What an attacker can do after MDM Enrollment
Today, most organizations create and distribute profiles through various MDM systems. But when I tried to find a simple tool that would allow building and analyzing Configuration Profiles for research purposes, I could not find a solution that fit exactly what I was looking for.
But as noted, in practice a .mobileconfig file is ultimately just an Apple Property List in XML format. In other words, there is no magic. If you can produce XML (i.e., write text), you can produce a Configuration Profile.
From this understanding, during the research an open-source tool called ios-profile-builder was built, which allows creating and analyzing Configuration Profiles for learning, research, and security testing purposes.
So we have arrived at the really interesting part - seeing the impact live and exploring how far each setting can be taken. Throughout this section I will examine several different types of profiles and their potential impact.
Figure 9 - MDM Dashboard in action
But, before we start talking about Web Clips, digital certificates, VPNs, or MDMs, there is one more fundamental question that needs to be answered. At the end of the day, none of the techniques presented below are worth much if the user does not install the profile in the first place.
And this is the central problem that occupies every attacker interested in exploiting Configuration Profiles - how do you get the user to reach the installation screen and click Install?
This is where one of the most interesting and popular social engineering techniques of recent years enters the picture - ClickFix.
ClickFix: Not making the system perform an action, but making the user perform it.
Behind ClickFix is a fairly simple idea - instead of bypassing security mechanisms, you can get the user to perform a legitimate action that the system was designed to allow.
In various campaigns, users were asked to run PowerShell commands, paste commands into a terminal, install browser extensions, approve system permissions, or perform other actions that under normal circumstances would raise suspicion. What all these cases have in common is that the system is not breached. It simply receives a lawful instruction from a user who was convinced to execute it.
You can look at ClickFix as transferring the execution mechanism from the attacker to the user. Instead of running code remotely, the attacker provides instructions. The user executes them. The operating system completes the rest.
At this point, the connection to the world of Configuration Profiles almost presents itself. If iOS does not trust applications but trusts user decisions, and if a Configuration Profile is an entirely legitimate mechanism of the operating system, then the mission is not to bypass iOS’s security mechanisms. The mission is simply to get the user to use them.
Figure 10 - What the user sees and what they don't
It is important to note that ClickFix is not the only technique, and not necessarily the most common one for distributing Configuration Profiles. In fact, in most scenarios examined later, we are not dealing with ClickFix in its classic sense.
The real value of ClickFix in this context is not in the technique itself but in the way of thinking it represents. Instead of focusing on how to bypass a security mechanism, it focuses attention on how to get the user to perform a legitimate action that the system already knows how to execute.
In this sense, ClickFix served primarily as conceptual inspiration for the research. It provides a convenient way to look at the same fundamental problem - how to get the user to voluntarily expand the device’s circle of trust.
For the purposes of this research, a basic ClickFix template was built demonstrating the referral process for installing a Configuration Profile. In a real scenario, the content, branding, and messaging would be tailored to the target audience and campaign objective.
If ClickFix answers the question “why did the user click Install?”, another question follows almost immediately - how did the profile reach them in the first place?
A Configuration Profile is no different from any other file. Before it can be installed, the user needs to receive it, open it, and start the installation process. This is where the Delivery stage enters the picture.
In the world of phishing and social engineering, Delivery is the channel through which the content reaches the victim. An SMS message, an email, a link on a website, a QR code, or even a legitimate internal organizational system - all are ultimately just means of delivering that content to the user. In the context of Configuration Profiles, the Delivery stage does not determine what the profile will do after installation. It only determines how the user will be exposed to it in the first place.
The exploits presented later are not dependent on a specific distribution channel. The same profile can reach the user through a wide range of mechanisms, and the examples that follow are examples only. In practice, almost any channel capable of getting a user to open a link or download a file can potentially also be used to distribute a profile.
Trust Me Bro, It's Our App
What Does It Do?
A Web Clip is a Payload that adds an icon to the home screen as a shortcut to a website - nothing more. Despite the appearance, it is not an application, no code is installed on the device, and no additional system permissions are granted.
The main advantage of a Web Clip is that it is configured to open in full-screen mode - the site loads without the familiar browser UI elements the user is used to seeing. The resulting experience closely resembles a dedicated app, especially when the site itself was designed accordingly.
Abuse Case
At first glance, a Web Clip does not appear particularly interesting from an offensive standpoint. After all, you can send a user a link via SMS, email, or WhatsApp just as easily. The key difference is that a Web Clip gives the site a permanent presence on the device’s home screen. With the right choice of name, icon, and UI, it can be made to look like a legitimate organizational app installed by the IT department.
From iOS’s perspective, of course, no application was installed at all. From the user’s perspective, however, the difference is not always obvious.
And this is where it starts to get interesting.
Modern websites now have access to a wide range of Web APIs that allow them to perform actions once reserved almost exclusively for dedicated applications. Depending on user approval and browser-supported capabilities, a website may gain access to:
Geolocation API - receive geographic location
Camera API - access to the camera
Microphone API - access to the microphone
Notifications API - display Push notifications (in supported cases)
Clipboard API - read and write to the clipboard
File Upload APIs - access to files the user chooses to share
Device Orientation / Motion APIs - data from motion and orientation sensors
WebRTC - real-time audio, video, and Data Channels communication
It is important to emphasize that each of these capabilities is subject to Safari’s permission and restriction mechanisms. A Web Clip does not bypass the operating system’s security model and does not provide unrestricted device access. However, as long as the Web Clip remains open and is not fully closed, the site can continue using approved permissions without presenting additional requests - a significant advantage for an attacker.
The Delivery Method Used Here (Arbitrarily Chosen)
An SMS message containing the relevant content, crafted to appear as part of an existing conversation thread with a known sender.
Putting it all together - full attack demo:
SMS from known source→ClickFix site→Profile installation→Web Clip on home screen→Permission requests→Attacker gets all
During the research, I found that the most interesting part is not necessarily the Web Clip itself, but the story built around it. Technically, a Web Clip is just an advanced shortcut to a web page. But when presented as part of a credible campaign - with government-style branding, consistent messaging, and ongoing updates - it becomes a tool of significant power.
This is essentially the principle of “Trust Me, It’s Our App”. The user doesn’t install the Web Clip because they understand what a Web Clip is, but because they believe the story presented to them. Once initial trust is established, the attacker can maintain that trust over time by updating the content, changing the messages, and adapting them to current events.
For the purpose of this research I developed a dedicated C2 server that allows managing and updating Web Clips in a centralized manner. During the work I also found methods that allow making the installation process completely seamless to the user through a specific approach to configuration profile installation - but since that knowledge could be misused excessively, I chose not to detail it in this article.
The main conclusion is that the risk does not stem only from a specific technical capability, but from the combination of ongoing management capabilities with a credible story that succeeds in making the victim see the Web Clip as a fully legitimate application.
Technical Breakdown of the Demo
The video presents WebClip C2 - a Command & Control platform developed for research purposes, demonstrating how Web Clips can be managed centrally, similar to managing Agents in classic C2 systems.
On the right is an iPhone with a Web Clip installed impersonating a legitimate application - in this case “SafeAlert”, simulating an emergency alert and public updates service. On the left is the management interface.
Victim Registration and Identification
Upon opening the Web Clip, the browser communicates with the C2 server and registers as a new device. From that moment it is visible in the control panel with technical details and activity tracking. The system collects:
Unique installation identifier
OS and browser details
Granted permissions
Connection times and activity log
Fingerprinting data for consistent victim identification
Geographic location
The Intelligence tab shows real-time location data received from the device after user approval - illustrating how a Web Clip that looks like an innocent app can collect high-precision location data.
Local Network Recon
The system performs a scan from within the browser environment to identify:
Default Gateway address
Active IP addresses
Accessible ports
Identifiable internal services
This gives the attacker an initial picture of the network environment where the victim is located.
Harvest Module
The Harvest module centralizes various data collection operations, including:
Location collection
Permission enumeration
Camera and microphone access testing
Clipboard interaction
Push Notifications
Social Engineering Screens
The purpose of these modules is not to exploit a security vulnerability - it is to exploit the user’s trust and the existing browser permission model.
PIN Capture Screen
Near the end of the video, PIN Capture is demonstrated. The operator pushes a dedicated screen to the victim’s device, presenting a UI that simulates a legitimate authentication request. Since the C2 operator controls the page content, messages, design, and social engineering scenarios can be updated in real time.
This is one of the most important points in the research: the real power does not come from one specific technical capability, but from the ability to maintain a credible relationship with the victim over time. The attacker can update the content at any moment, adapt it to current events, and sustain the illusion of a legitimate, actively maintained application.
Side note: Normally, when a user closes a Web Clip or moves it to the background, its JavaScript environment is suspended and access to permissions stops with it. During the research I found several mechanisms that allow extending the session life and preserving some logic even when the Web Clip is not in the foreground. One method I experimented with used an active media player streaming an imperceptible audio signal, causing the OS to continue treating the app as active. I also developed a second mechanism based on Notifications, not shown in the video. The inspiration came from the way services like YouTube continue executing logic after the user switches to another app or minimizes the browser window.
Trust Me Bro, It's The Company Wi-Fi
What Does It Do?
A Wi-Fi Payload allows pre-configuring a wireless network on the device via a configuration profile. From the user’s perspective, it is a convenient way to automatically connect to a corporate network without entering a password or performing manual setup.
In many organizations this is a completely legitimate process - the IT department sends employees a configuration profile, the user approves the installation, and the device connects automatically to the corporate network. From the operating system’s perspective, this is a normal and familiar management mechanism. From an attacker’s perspective, it is a mechanism built almost entirely on trust that can be exploited.
Abuse Case
Most users have no idea what a Wi-Fi profile actually contains. When presented with a message such as “Install the new corporate network profile” or “Connect to the company emergency network,” most will assume it is a routine action coming from the IT department.
The average user sees a familiar network name, a corporate logo, and instructions that look legitimate. They do not examine the configuration details and do not check what additional settings were included in the profile. And this is where it gets interesting.
For most people, Wi-Fi is infrastructure - something that should “just work.” Precisely because of this, requests related to network connectivity are perceived as less suspicious than installing an application, entering a password, or opening an unknown file. The attacker exploits the built-in trust users have in network connection processes.
The Delivery Method Used Here (Arbitrarily Chosen)
For this demonstration, a relatively simple scenario was chosen: the attacker distributes a flyer that appears to have been sent or shared by the company. The flyer contains a QR Code pointing to the installation site.
The user scans the code, goes through an installation process that looks completely legitimate, and approves the configuration profile installation. After the process completes, the device automatically connects to the Wi-Fi network configured by the attacker.
From the moment of connection, the user can be presented with a Captive Portal or a “user authentication” screen impersonating a legitimate corporate authentication mechanism. From the user’s perspective, this is a familiar process of connecting to the corporate network. From the attacker’s perspective, it is an opportunity to harvest credentials or other sensitive information.
Unlike simply providing an SSID and password, a Wi-Fi profile allows the attacker to pre-configure all connection details, precisely choose which networks the device will join, and create an onboarding experience that looks like an official, managed IT process.
Putting it all together - full attack demo:
QR Code→ClickFix site→Profile installation→Device joins attacker Wi-Fi→Captive Portal appears→Credential harvesting
Similar to the Web Clip scenario, the power of this attack does not come from a particularly complex technical mechanism, but from the trust the user places in the process. The user connects to the network not because they checked the configuration details, but because they believe it is the legitimate corporate network. It is precisely at this point that a legitimate management mechanism becomes an effective tool in a social engineering-based attack chain.
Technical Breakdown of the Demo
The video presents a full scenario in which a user is asked to connect to the wireless network of a fictitious organization called Aurora Energy Group. The process begins with a dedicated landing page presenting the connection process as a routine IT procedure, providing the user with clear instructions for installing the configuration profile. After approving the profile on the iPhone, the system automatically configures a new Wi-Fi network named Aurora-Employee, and the device connects to it without requiring any password entry or additional user action.
Immediately after connecting, a Captive Portal appears - designed as a seamless continuation of the branding and experience presented in the previous steps. The portal displays a corporate authentication screen and asks the user to enter their credentials to “complete the connection.” From the user’s perspective, this is a unified and continuous process of connecting to the corporate network. From the attacker’s perspective, it is a chain of entirely legitimate components leading to credential harvesting.
The demo illustrates how standard Wi-Fi and Captive Portal mechanisms can be leveraged to create a credible and convincing user experience, without relying on security vulnerabilities or bypassing operating system protections.
Trust Me Bro, Route Everything Through Me
What Does It Do?
A VPN Payload allows configuring a VPN connection on the device via a configuration profile. After installation, the device can route its network traffic through a pre-configured VPN server, without any manual setup required from the user.
Organizations make extensive use of VPN as an integral part of their network access infrastructure, particularly for remote employees or mobile devices.
It is worth noting that unlike Proxy-based configurations, a VPN solution generally offers broader coverage of network traffic. Since routing occurs at the operating system level, most applications cannot easily bypass it - resulting in more consistent control over the device’s communication paths.
That said, there is also a significant difference in terms of user visibility (OPSEC). Modern operating systems typically display a clear indicator when a VPN connection is active - either through a dedicated icon or a status bar indication. In practice, many users tend to ignore this indicator or do not understand its significance, but it is still a visual cue that does not always exist with other mechanisms.
Although similar results can be achieved using a Global HTTP Proxy Payload, I chose to focus on VPN since it does not depend on Supervised Device management requirements. For this research scenario, VPN provides a simpler, more practical, and more realistic attack chain.
It is also important to note that installing a VPN alone does not automatically grant the ability to inspect or decrypt HTTPS traffic. To do so, a trusted Root CA certificate must also be deployed to the target devices. Technically, the certificate can be included as part of the same configuration profile, but modern operating systems have additional protection mechanisms that require the user to explicitly approve trust in the certificate.
This creates an additional friction point in the deployment process. In my experience, users do not make such decisions based on a technical understanding of what a Root CA means, but based on their level of trust in the party requesting the installation. Therefore, as with other management mechanisms discussed in this article, the most significant factor here is not purely technical - it is human. The ability to convince the user that this is a legitimate component required for security improvement, troubleshooting, or access to organizational services.
Abuse Case
Most users do not understand the practical implications of installing a VPN profile or the extent of its effect on device communications. When presented with a message like “Security update required for access to company services” or “Install Secure Access Gateway to improve browsing security,” they will typically treat it as just another technical step in the corporate onboarding process.
From the user’s perspective, nothing changes materially. Applications continue to work, websites continue to load, and daily work continues as normal.
From the attacker’s perspective, however, the device may begin routing a significant portion - or all - of its network traffic through infrastructure under their control.
The Delivery Method Used Here (Arbitrarily Chosen)
For this demonstration, a scenario was chosen in which the attacker sends an email impersonating an official communication from the IT department. The message presents a security initiative or infrastructure upgrade and includes a QR Code pointing to a dedicated installation page.
From the user’s perspective, this is just another routine organizational process designed to improve browsing security or access to internal services.
Upon completing the installation, the new network settings are applied to the device, and the user continues using it completely normally - without being required to take any further action. For the user, this is a standard onboarding process. For the attacker, it is a new control point obtained through social engineering alone.
Putting it all together - full attack demo:
Email→QR Code→ClickFix site→Profile installation→Traffic routed through attacker infrastructure
Technical Breakdown of the Demo
The video presents a scenario in which a user receives a message impersonating an official communication from the organization’s IT department. The message describes recently discovered connectivity issues and invites the user to install a new network configuration update by scanning a QR Code attached to the email.
After scanning the code, the user is directed to a dedicated installation site and installs a configuration profile containing VPN settings. The installation process is presented as part of a legitimate infrastructure upgrade designed to improve connection stability and access to organizational services.
Upon completion of the installation, the device establishes a VPN connection and begins routing network traffic through the infrastructure configured in the profile. On the attacker side, the new device appears in real time in the management interface - including its assigned IP address, connection status, and additional activity information.
The video then demonstrates several modules for analyzing traffic passing through the infrastructure, including service and site classification, domain information observed in traffic, usage statistics, and additional data collected as part of monitoring activity.
One of the interesting aspects of this scenario is that it can serve as an initial stage in a broader attack chain. Instead of relying on an exploit or code execution, the attacker achieves an initial foothold through legitimate management mechanisms and the trust the user places in them.
Trust Me Bro, I'm IT
What Does It Do?
An MDM Enrollment Payload allows registering a device with a Mobile Device Management system. After enrollment, the management server can manage various aspects of the managed device according to the permissions granted, the profiles installed, and the organizational policy configured.
MDM is one of Apple’s central management mechanisms, used by organizations worldwide to manage endpoints, distribute configurations, install profiles, enforce security policies, deploy digital certificates, configure VPN, Wi-Fi, corporate email, and more.
Unlike the other Payloads covered in this article, MDM is not interesting because of one specific action it can perform. It is interesting because it changes the relationship between the device and the server. Instead of installing a single component, the user grants the server the status of an administrative authority. From that point on, many of the actions presented in earlier sections can be carried out as part of the system’s legitimate management mechanism. In a sense, this is the Final Boss of the Trust Me Bro series.
Abuse Case
Most users do not fully understand what enrolling a device in an MDM system means. When presented with a message like “Your device needs to be enrolled in company services” or “Install a management component to access organizational resources,” most will treat it as a natural part of the IT process.
From the user’s side:
They see official iOS system screens
They see the term Remote Management
They see the organization’s name
They see the system itself requesting approval
Precisely because all of these elements come from the operating system, they reinforce the sense of legitimacy and reduce the user’s level of suspicion. In practice, the user does not approve the enrollment because they understand what an MDM system is or what permissions they are granting. They approve it because they trust that the party in front of them is the IT department.
And that is exactly the point that makes this Payload unique.
If each of the previous sections dealt with exploiting a single management mechanism - Web Clip, Wi-Fi, VPN, or Certificates - MDM sits above all of them. It is not just another Payload; it is a mechanism capable of deploying and managing many of those same components as part of a legitimate management process.
The Delivery Method Used Here (Arbitrarily Chosen)
For this demonstration, a scenario was chosen in which the user connects their iPhone to a computer controlled by someone impersonating IT. The user is asked to approve the “Trust This Computer” prompt as part of a support, diagnostic, or device enrollment process.
After approving the Trust, a Pairing Record is created between the computer and the device. From this point, legitimate tools such as pymobiledevice3 can be used to communicate with iOS management services via Lockdown and usbmux interfaces. In the demonstration scenario, the tool is used to install a configuration profile that initiates MDM Enrollment - using Apple-supported mechanisms and without exploiting any operating system vulnerability.
The key research point is that the user does not perceive the Trust action as granting significant administrative access. From their perspective, it is a momentary technical approval required so that “the computer can recognize the iPhone.” In practice, this is an important trust transfer - once the device is paired, the computer gains the ability to perform certain management interactions with the device as long as iOS restrictions, lock state, and user permissions allow it.
Important note: Contrary to what is sometimes assumed, enrolling a device in an MDM system does not turn the MDM server into a C2 and does not grant unlimited control over the device. Even after enrollment, the MDM server is subject to Apple’s permission model and management capabilities, and cannot perform arbitrary actions or execute code freely.
That said, precisely because this is a legitimate, high-trust management mechanism, it can serve as an effective starting point for a broader attack chain. After the user completes the enrollment process, additional management components supported by the platform can be deployed, additional organizational policies can be applied, and further management actions can be performed as part of the relationship established between the device and the server. There is the possibility of taking the scenario further - but since this article is already long, that will be discussed in a separate article.
Putting it all together - full attack demo:
"Let me diagnose your phone"→Trust This Computer→Managed Profile Deployment→MDM Enrollment
Technical Breakdown of the Demo
For the demonstration, a personal MDM server was built specifically for this research. The reason for choosing a personal MDM server was to illustrate that the enrollment and trust mechanism presented by iOS is identical to the one used by organizations in production environments.
At the end of the demo, the device has successfully enrolled in the MDM server and appears in the management console as a managed device. This is where the scenario presented in this article ends. Unlike the previous sections, where the focus was on the capabilities of a single Payload, the emphasis here is on establishing an ongoing relationship between the device and the management server - a relationship from which further management actions can continue to be performed within the scope of Apple’s legitimate capabilities.
To reproduce the research environment, a full infrastructure was developed based on pymobiledevice3 and an MDM server, including all setup components, scripts, and instructions required to build an identical research environment. The full source code, installation instructions, and project documentation are available here:
Important tip: To enhance the sense of legitimacy, a public MDM service offering a free trial can be used. As a result, the enrollment process occurs against a real MDM server, and the profile presented to the user is signed and identified by iOS exactly as it would appear in a legitimate corporate enrollment. From the user’s perspective, there is no indication that the environment belongs to an attacker.
Such services are available at:
SimpleMDM - offers a free trial after registration - simpleMDM.com
Mosyle - offers a free plan for small organizations (up to a limited number of Apple devices), as well as extended trial periods for advanced plans - mosyle.com
What Comes Next
Although this article covered a wide range of Payloads supported by Apple Configuration Profiles, it is far from exhausting all the possibilities the platform offers. Its purpose was to present the key friction points between legitimate management mechanisms and the trust users place in them - not to serve as a complete map of all iOS capabilities.
Throughout the work, I focused primarily on scenarios where the user is the central and weakest link in the chain.
One topic not covered in this article - but which will be the focus of the next research - is examining the boundary between Apple’s legitimate management mechanisms and the ability to turn them into a persistent management platform. The next article will examine what can be done after trust has already been granted. It will present scenarios including managed application deployment, establishing a persistent communication channel (C2) based on legitimate platform mechanisms, and combining additional management capabilities to understand how far the boundaries of MDM can be stretched without exceeding Apple’s security model. In other words, if this article was about creating the relationship - the next one will be about how far it can be taken.
Finally, I believe the most interesting part is not technical at all. Ultimately, every scenario presented in this article rests on the same simple premise: users do not place their trust in technology - they place their trust in the story told to them. Understanding the relationship between Apple’s management mechanisms and users’ perception of trust is, in my view, one of the most interesting research directions for offensive security.